Showing posts with label home decor. Show all posts

Friday, April 8, 2016

Going Gray

If you know anything about gray then you know just how finicky it can be. The color gray (or grey) has so many variations – maybe a few too many IMHO. Choosing the right gray (or any color, really!) can leave you a little paralyzed, no?
 
I always hear people say “it’s just paint” and yeah…it is…but umm, hello!! #realitycheck. Who wants to paint something more than once? Not I. 

So whenever I choose paint (especially grays!) I always, ALWAYS buy a sample and try it out at home before committing. You should too.
 
Both Home Depot and Lowe’s have sample pots for under $5 and can mix any color from any manufacture in the paint brands they carry – Behr/Glidden @ Home Depot and Sherwin Williams/Valspar @ Lowes.
 
Knowing which color direction we were going in (gray) I headed to Home Depot armed with a long list of different grays from all different brands and asked the gentleman behind the counter to mix up some sample pots for me. I left the store that day with 8 samples and went home to try them out.
If you follow me on Instagram (smash that Follow button if you don’t) then you saw this a few weeks back:


We painted these 8 colors in 5 different places around the dining/living room and sun room just to see how the color would react or change depending on the different levels of light throughout the house. It’s important to do this in multiple areas throughout the space because the same color may take on several different tones depending on how much (or how little) light those areas receive throughout the day.


As I tried these samples on the wall, I knew almost immediately which ones weren’t going to work. I also knew almost immediately which one would. Gray is a funny color – some too blue, violet, brown, or even green – and seeing them all lined up next to each other made the undertones even more apparent. Can you spot the undertones in the photo above or below?


Even though I heavily leaned toward one favorite, I let S, my Mom, my Dad, even the 2 dump guys weigh in! S was firmly planted in the Stonington Gray camp and I was in love with Gray Owl…both from our buddy Benjamin Moore. While I loved Gray Owl (brown undertones) as is, Stonington Gray (blue/violet undertones) was a tad too dark for what I envisioned in this space. But I still wanted to take S’s opinion into consideration so I agreed to try a lightened version of Stonington Gray and see if that would change my mind.
 
So back to HD we went.

I asked the paint guys to mix me up a sample of Stonington Gray lightened 25% and another lightened 50%. And!! Because I’m a complete lunatic, I picked up a few other samples as well. Bringing the grand total to 12! #somebodyhelpme


We tried these additional 4 colors on the wall and spent the next few days staring at walls.


And guess what?!
 
I still loved Gray Owl more than any of the 11 others.
But...I lied.
Yep. I sure did. I told S I liked Stonington Gray lightened 50% and that we’d go with that one. Partly because I felt bad that I had asked his opinion just to veto it anyways and partly because I was trying to convince myself to love it even though I knew I wouldn't. I have a habit of doing that sometimes. #allthetime
 
But I forged on and did what any insane person would do.
 
I painted our entire hallway with the sample pot of Stonington Gray lightened 50%.
 
To S it looked like I had committed to the color he chose but I was just trying to convince myself I could actually live with it – haha!
 
Turns out I still hated disliked the color – it was even more purple (to me) in a larger dose – and it was then that I decided to trust my gut and go with Gray Owl. Without telling him. #ofcourse
 
I took S with me to HD to order the paint – mainly because I needed his muscles to carry the 5 gallon bucket of paint – but also because he’s pretty cute too. Luckily for me, he has a habit of sitting in the section with the outdoor furniture while I peruse the paint aisles so this worked perfectly for my genious color-swapping plan. Thank you Home Depot for putting the outdoor furniture near the paint section! #highfivesallaround
 
By time we got home with the paint he was none the wiser. Where’s that sly looking emoji with the smug smile when you need one?
 
The next day (while S was at work) I slapped a coat of paint on the walls and because we’re installing new baseboards and crown there was no cutting in needed!

 
When he came home from work that night the first thing he did was comment on how much he liked the color and said we had absolutely made the right color choice. Bahahaha!! #littledidheknow

I’ve since come clean. And he still loves the color. #andmetoo
 
Do you? The color, not me, silly.
  If you're thinking about dipping your toes in the gray paint waters (or any paint really!) here's a few tips to help you choose the right gray for you:

Find Pinspiration

Not sure where to start? Browse your Pinterest boards and see what colors/rooms you're drawn toward. Often times we Pin the same type, style, or look over and over. Are you pinning bold, moody rooms, or do you gravitate towards the light and bright spaces? Pinterest can tell you a lot about your own personal style and esthetic and is a great first stop on your painting journey.

Bonus: if you're not already following, be sure to keep up with me and all my latest Pins. I'm a pin-binger.
 
Buy the sample pots

Never ever buy a color based off what you see on the paint chip in the store. Even though it's an extra step (and an extra expense), the sample pots are absolute worth it to get it right the first time around. 

Bonus: those little sample pots come in handy for crafts or smaller projects around the house

Don't Limit Yourself 

Don't limit yourself to only the the colors offered by the manufacture(s) your hardware store carries. Any hardware store can and will mix any color from any manufacture in the paint line(s) they carry.
 
Bonus: Here's a great blog post about what stores carry what lines
 
Go Big or Go Home
 
Paint a swatch - a big one!! - on your wall and in several other areas throughout the space you're planning to paint. And then spend a few days staring at your choices.
 
Bonus: Don't forget to look at your paint colors at all hours of the day. Be sure to evaluate them in the morning, mid day, and night too! You'd be surprised how much the colors will change throughout the day.
 
Ask a Pro
 
Once you've chosen your color be sure to ask your paint pro their recommendations regarding sheen, application, and amount of paint needed depending on your project specs.
 
Bonus: Paint calculator #forthewin

 
So? Are you ready to dive right in and get your paint on? Tell me! How did you choose your color? Have you ever painted your walls only to find you hated them later? Do tell!


Friday, December 4, 2015

2015 Christmas Home Tour

This time of year is always so much fun and everyone’s favorite. For me, it’s been a little bitter sweet and filled with mixed emotions. All though their due date was in January, our girls most definitely would’ve made their grand entrance some time in December had we made it full term so I imagine this time of year will always bring reminders of that. Although they can’t be here with us to see the magic of the season unfold in person, we know they’re always close in our hearts and that’s reason enough to celebrate this time of year just as we always would.

I didn’t put much thought into this year’s décor. There’s no theme other than deciding to do an all-white tree. Much of what we used this year is the same items we’ve used in years past, just pared down…if that’s possible to do while decorating for Christmas. I have four giant bins of Christmas décor and found that I used the contents of maybe two of those bins. This tells me it’s time to purge what isn’t being used.

But enough chit-chat…let’s dive head first into our “traditional” Christmas décor around the apartment.

Our entryway received a subtle nod to the season with a couple holiday print throws for a festive touch. I’d love to find an old pair of ice skates to hang here as well.


The view of the tree is the first thing you see as you walk in through the front door.


To the left of the tree we have our TV and media cabinet in the nook. Without a traditional mantel, I hang our stockings from the cabinet using black 3M Command Hooks (every renter’s best friend). Works like a charm!


Our friend Anthony the antelope who lives above the TV got into the holiday spirit as well with a scrap piece of fabric tied around his neck as a scarf.


The coffee table got a dose of Christmas cheer too with a red runner, a pine scented (the best!) candle, and some season appropriate vase filler.


The couch wall received the most holiday décor. I swapped out the pair of black couch pillows for smaller red ones that read “Merry & Bright” and a wreath hung up by some candy cane ribbon replaces the round mirror. Excuse my horrible bow tying skills – I was running out of steam by the end!


The long console table behind the couch (tutorial coming soon!) has a few bottle brush trees I picked up at Target this year which I paired with some red glass ones I already had. The only other change I made to the table was to change out the books on the right for more seasonally appropriate colors. One of the things I love most about decorating is the ability to shop your own home, using what you have but giving it a twist to achieve the look you’re after – like giving the antelope a scarf, using the same hurricane candle holder but popping in a seasonally scented candle and vase filler, swapping out the mirror for a wreath, or using books in the right color pallet – all things I had on hand but helped sprinkle the festive touches throughout!


Directly across from the couch is the focal point of the entire room…the TREE!


We purchased a new 7 ft. Slim tree from Michaels this year for $40 and at first I wasn’t sure I’d like it but now I LOVE it! It’s perfect when you’re limited on space just like us!


I loaded it up and just love how it turned out. Our tree was already pre-lit but that didn’t stop me from adding two strands of round globe lights. I love the mix of the different lights and on the smaller tree I think it really pops!


I also spotted this snowball garland at Target and added two strands of that as well. Think beyond regular ornaments for tree décor – anything is fair game!

From there I added a lot of floral picks I got on major sale at Michaels and just a few actual ornaments I already had on hand –  white glittery ones (because glitter is always better) and some clear ones for another added layer without taking away from everything else.

I set up a wrapping station using a glass vase which neatly corals my wrapping paper rolls, ribbons, tape, and scissors all while doubling as festive décor along-side the tree. While rifling through my wrapping paper stash I noticed an abundance of red & white paper so I just went with it. The red chevron and hounds tooth paper I found at the Dollar Store last year!


The last stop on our Christmas home tour is the kitchen. I added a few hot chocolate supplies – cocoa mix, marshmallows, and chocolate chips in mason jars to our bar tray. We just dump our hot chocolate concoctions to our sweater adorned mugs and fill with steaming hot water via the Keurig. Nothing better than a yummy cup of hot chocolate to cuddle up with on the couch!


That’s all the Christmas I have to share with you from our little corner of the world – hope you enjoyed the tour and get a little inspiration to deck your halls this holiday season!


Thursday, December 3, 2015

The Entryway Re-do

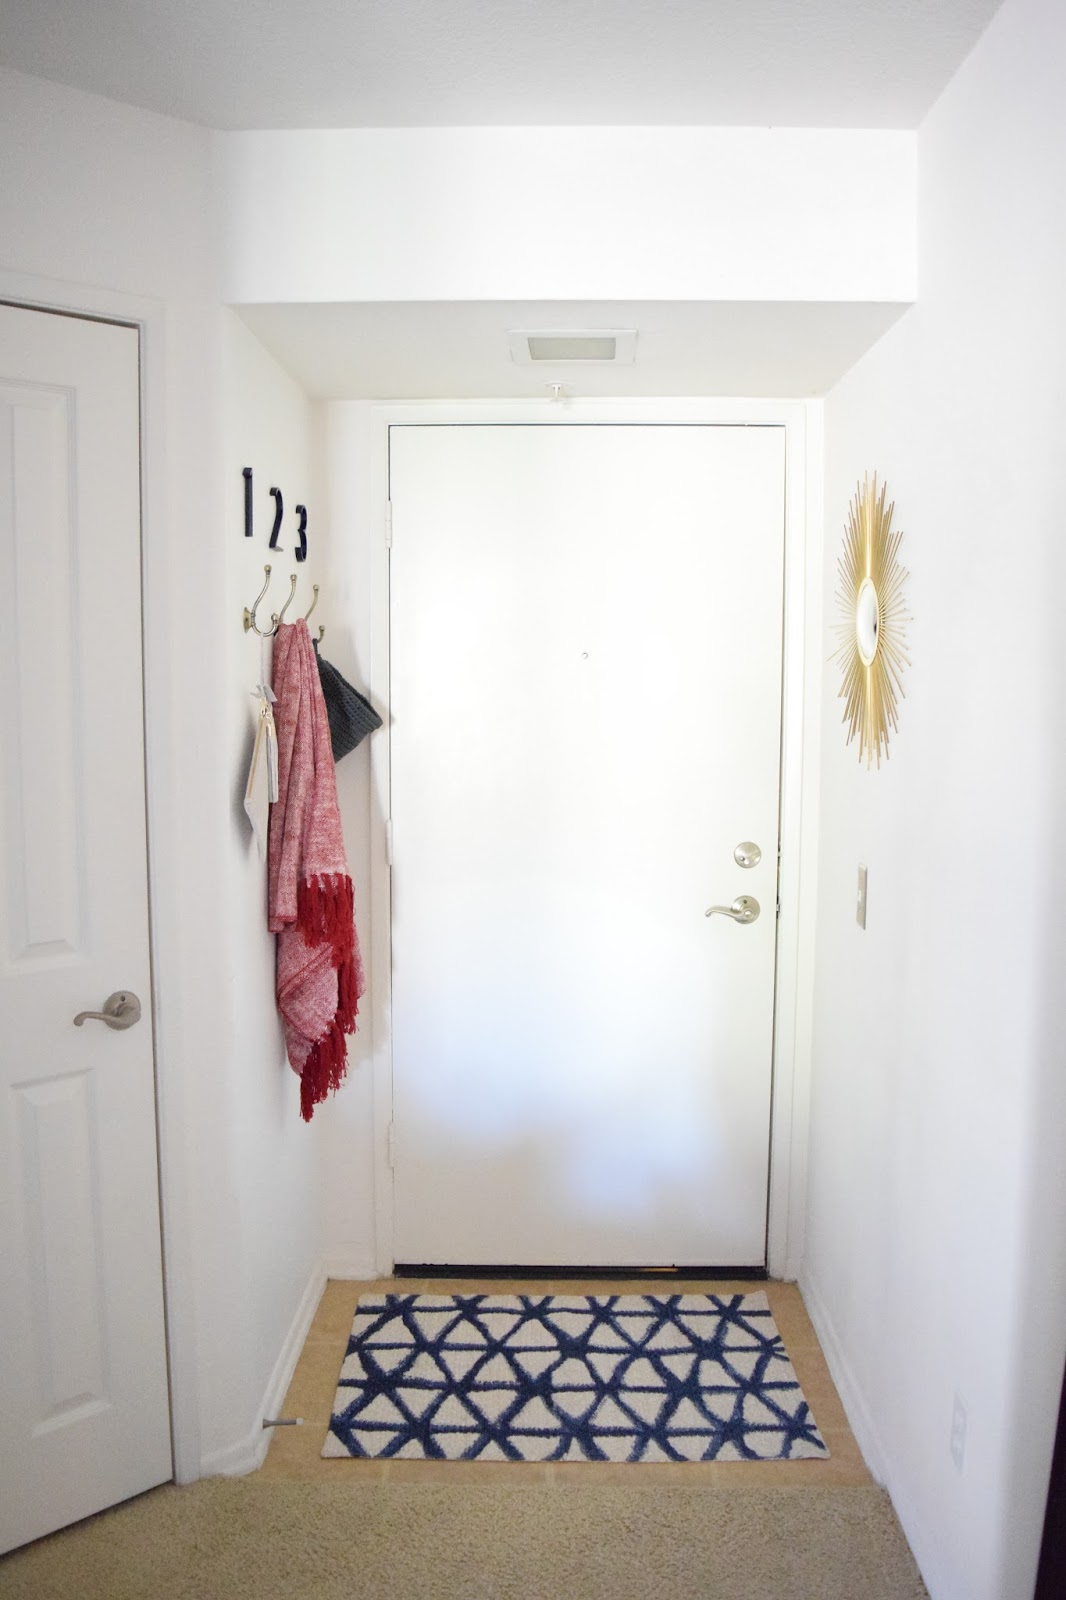
The entryway in our apartment can hardly be called an entryway. It’s a 4’x3’ pint-sized speck of space that really has been useless…until now! Despite its small footprint, the functionality of this space really needed to pack a punch. An entryway in a home is probably one of the hardest working spaces a home can have. It’s the first space we encounter when we walk through the door and the place we unload our junk – think hats, jackets, bags, keys – just to name a few.

The problem with our entryway or lack thereof, is the tight spacing. The swing path of the front door is essentially all we have to work with. That’s it folks. We tried a few different options (as seen below) and even mocked some up in the past but none ever seemed to fit the bill when it came to functionality.


This shelf situation lasted the longest but probably only out of laziness or from being stumped as to how to solve the problem. Then one day I was just so fed up with it and took everything off the wall. As with most projects – starting with a blank slate is really the first step. It pushes the reset button on the space and allows my brain to reset too in terms of design. Without the distraction of “stuff” I hate staring back at me, I can start brainstorming on a solution that I’ll love in the end.

I patched all the holes and gave the wall a fresh coat of paint. Then I made a list of the issues.

Clutter was the #1 issue and biggest driving force behind the entryway re-do.  What I learned from the last time around that I tackled this space is that we’re not a family that can handle “open shelving”. Some are, some aren’t. We are definitely in the AREN’T category. Unless I constantly policed or tidied up the shelf, it was a constant catch all for “stuff”…receipts, business cards, candy and/or candy wrappers, change, pens, pencils…etc. It was a nightmare.

The 2nd biggest issue was ease of convenience. Over time I’ve found that unless it’s easy, kids and ahem…grown men, won’t use it. It was amazing to me how many times I found jackets strewn all over the house – on the couch, backs of chairs, on the floor (!!!!), when our coat closet was literally an arm’s reach away! Apparently small kids and grown men have trouble opening doors and reaching for a hanger to hang up their coats.

With all my issues written down, I set about to solve them once and for all and give our tiny entryway a whole lot of functionality too. What I ended up with is hooks and baskets. No more open shelves! I determined that clutter will always be but I can handle the clutter so long as I don’t have to see it J. Below is the end result – ain't she pretty?


I installed a set of 3 hooks that people of all ages can use with ease – no more hassling with hanging our coats in the coat closet. For whatever reason, hooks are so much easier for kids and even grown men to use. The thought! We still keep additional coats in the nearby closet but for the ones we use more often, these hooks have been a saving grace. They’ll come in handy too for guests who need a quick and easy spot to store their coats while they’re visiting without having to ask where to put it. Using the hooks in our entryway have worked so well that I’m thinking of using them in the bathrooms too instead of towel bars – another things certain people in our household have trouble using!


To tackle all the other clutter that seems to accumulate at the front door, I hung up a woven basket that I picked up from the bath section at Ikea to corral wallets, receipts, cards, loose change – all of the above! As I said before…as long as I don’t see it, I can deal with it. The basket conceals the mess and is big enough to hold every day essentials like wallets and keys. I still keep my keys inside our coat closet with my purse, but for my guy who likes to empty his pockets at the door, this has been a perfect solution for him. When it starts getting out of hand, I can easily sort through the contents and purge what isn’t needed. What was once a daily battle is now something that only needs to be managed once a week. A win-win.


Once the issues had been addressed, it was time to add in some personality! My favorite part of any project. I added a couple of address numbers above the hooks because they were right next to the hook section at Lowes and I liked how modern and sleek they looked next to the almost aged look of the hooks. I painted the numbers a deep navy blue which ties in the brand new Target rug I found at Goodwill (score!). Goodwill is like Target’s clearance center in case you haven’t been lately.


The sunburst mirror added to the opposite wall lets us ladies (or guys too) do a last minute quick look when we’re headed out the door and it’s gold color coordinates with the aged hooks on the opposite wall.


Here's a look at the new entry in relation to the coat closet that I organized almost a year ago. The systems I installed nearly a year ago are still working well for our family so now with the functionality of both these spaces give us no room to make excuses!


Making these small changes has really added so much value to this tiny space and allowed it to really work for our family. Living in such tight quarters makes every bit of real estate so valuable and when it can function the way our entryway functions now it makes the time and money spent very well worth it.

Thursday, November 12, 2015

Fall for $20


Although the calendar indicates that Fall is officially here and underway, Southern California hasn't gotten the memo. It's still hot around these parts (we're flirting with the 80's) but temps have been dropping and I hope they continue to do so. There's no time of year I love more than Fall.
 
I usually break out the Fall / Halloween décor by late September / early October to really get into the spirit of things that this time of year brings but with everything we've been through over the last few months, I just haven't gotten around to it.
 
With Halloween almost here and Thanksgiving just around the corner, I wanted a quick and simple project that would sprinkle our home with those warm and cozy fall feelings without having to drag our décor bins from the depths of the black hole garage.
 
Buffalo check is all the rage right now and what perfect timing because this bold take on a classic plaid print is so fitting for the season. Ive been oogling over these gorgeous pillows but when I spotted a similar fabric at Ikea for a fraction of the cost, I picked up a yard on a whim and decided to make my own low-budget version.
 

If I've said it once, I'll say it again - pillows are the easiest way to change up the look and feel of a room in an instant without much of an investment. So with my Ikea fabric, I made two pillow covers in about 30 minutes start to finish all in an effort of infusing a little fall coziness into our main living space.
 
I've done my fair share of sewing but usually just ask my super-sewer Mom to make my pillow covers for me instead of bothering to do it myself. But these ones? They're all me! Even someone with the most basic of sewing skills could whip these up, no problem!
 
With a little direction from my Mom, I made two super simple envelope style pillow covers out of 1 yard of fabric. The Internet (and Pinterest) is flooded with tutorials for this type of DIY so I won't bore you with another - just click here and use any one of these tutorials to make your own.
 
But how about a few helpful hints before you dive right in?
 
#1 - Always remember to make your cover smaller than your pillow insert. This may seem illogical but it's the most important thing I've learned and the key to getting the fullest pillows! A general rule of thumb is to make your cover 2" smaller than your pillow insert. For example: if your inserts measure 20" x 20", you'll want to make your pillow cover a finished size of 18" x 18". Be sure to account for your seams when cutting your fabric!
 
#2 - Reinforce the seams where the two back flaps of your cover overlap. When you're stuff your cover with the insert, that area will have the most stress put on it from all the pushing, pulling, and re-arranging your insert. Having a reinforced seam will make sure that your cover doesn't literally rip at the seams.
 
With those tips in mind, after my covers were sewn, I gave them a quick press with the iron just to iron out any wrinkles and to press the seams. But I didn't stop there. I decided to add a few yarn pom-poms to each corner of the pillow because nothing says fall like a good plaid and some cozy textures!
 
To make the over sized pom-poms you'll need:
  1. Yarn
  2. Scissors
  3. Steel yarn needle
I started by wrapping the yarn around 4 of my outstretched fingers like so:
 
I wrapped the yarn loosely around my fingers approximately 70 times until my bundle was pretty thick. The same technique can be used around less fingers or wrapped around fewer times to achieve a smaller pom-pom too.
 
There are several tools out there that you can buy to assist you in making pom-poms but I didn't have any of them so I improvised and used my fingers instead which seemed to work out just fine.
 
Once I wrapped the yarn around a sufficient amount of times, I carefully slid the bundle off my fingers and laid it in the center of a 12" piece of yarn that I had previously cut.
 
With the single piece of yarn, I tied a knot in the middle of my bundle and then flipped it over and tied a second knot.
 
With the tied bundle, I slid my scissors through the loops on either end and cut - careful not to cut the center tie.
 
After cutting all the loops on either end you can choose to trim your pom-pom for a more uniform look or leave it as is.
 
Once I had all my pom-poms made, I used a steel yarn needle threaded with a length of yarn and sewed each pom-pom to the corner of my covers. Easy-peasy!
 
Ready to see the final result?


How cozy are these pillows? And what a big difference they make! Not too shabby for $20, right?!


Gimme all the heart eye emojis...I think I'm in love! Are you too? Please tell me you agree!
 

Thursday, June 18, 2015

Living Room Cha-cha-changes

I've been making a few changes to our main living space and am dropping in today to share the first of many minor tweaks that have been happening over the last few weeks.
 
I've been eager to infuse a little more color into our normally neutral living room for quite some time and one of the easiest and most cost effective ways to do that is through pillows. It's so easy and convenient to change out your pillows throughout the season or hey...just because! I'm a known hoarder of pillows and can always be found perusing the pillow aisles at any home décor store. One of the greatest things about having a mainly neutral base is that it makes adding color on a whim, so easy!
 
 
I picked these vibrant blue floral motif pillows up at HomeGoods and I think they're the perfect counterpart to the darker navy curtains while boldly standing out against the neutral backdrop of the couch.
 
 
I'm loving these new pillows so much and think they bring in the perfect amount of color for summer.
 
 
What do you think? Do you love HomeGoods as much as this girl does? Have you ever switched out your pillows for an instant change or for a quick living room face lift? How are you infusing color into your home this Summer?
 
Be sure to check back soon for the other living room changes we've made over the last few weeks! I'm so excited for you all to see!
 

Friday, May 15, 2015

Aloha!

In a little over 3 weeks, I'll be 30k feet in the sky and on my way to Hawaii. Aloooo-ha! I cannot wait! The sand and sun will sure beat this weird rainy weather we've been experiencing the last few days. Rain in California? Is there even such a thing?!
 
This time around we chose to rent a house vs. staying in a hotel and from what I can gather from all the reviews and recommendations from friends and family...it's absolutely the way to go. The pictures online of the house are stunning. It's a waterfront property and exactly what tropical dreams are made of. If you follow me on Instagram (you totally should) I'm sure I'll be sharing plenty of beautiful sites and scenery along the way, so don't miss out!
 
Because I have Hawaii on the brain, I've rounded up some items with a tropical flair and thought I might share my finds with you! Even if you can't go on a little tropical vacay, doesn't mean the tropics can't come to you!
Hawaiian Style 
 
I'm pretty sure there aren't any flamingos in Hawaii, but hey...I couldn't resist. Also...I'm dying to get my hands on those canisters. Who doesn't love pineapples or white ceramics?! Umm...no one! As for that pineapple bowl...I recently scored a similar one at a thrift store for a couple bucks, but this one is gorgeous. And that flatware. Don't get me started. Just make sure you leave enough for me to buy too!
 
We'll be vacationing in Oahu and while this will be our second time visiting this beautiful island, I'm always eager to find new places to explore, see, or things to do! That's where you come in. Suggestions are very much welcomed before I head on out! Any must-see, must-do, must-eat spots that you absolutely love? Help a girl out here, I'd love to hear!