Showing posts with label do it yourself. Show all posts

Monday, October 16, 2017

Checking In: Living Room Built-ins (Nearly a Year Later!)

DIY is always a slow moving train around here. Between the two of us working full time, a 8 month old, and year-round softball - life is one huge time suck and there just isn't much time or energy leftover for house projects.

I had to scroll all the way back to December 2016 in my phone to find this photo:


Those are our cabinets for the built-in getting delivered - almost a year ago!

Man...we suck!

Anyways...it's almost December 2017 and we're still not done. We're close though!

Ok, I lied. We're about 50% done. But since the living room built-ins is on our list of 2017 House Goals list, I thought I'd show you where we're at and how we got here.

After soliciting several quotes and dying of sticker shock (basically this project all over again) we decided to DIY. DIYing a built-in isn't really all that hard. It's just intimidating. So before we got started, we pulled inspiration from these DIY built-in projects here, here, and here and just went for it.

We chose to use unfinished upper kitchen cabinets from Home Depot because they were readily available, affordable, and wouldn't eat up a lot of floor space. They arrived December 17, 2016 - see picture above.

We went with five 30" upper kitchen cabinets for an almost 13 foot built-in unit! Hellllo storage!


After the cabinets arrived we built a base for the cabinets to sit on. We did this so that we could wrap baseboard around the base of the cabinets for a "built-in look". We chose to have the base flush with the cabinet fronts rather than set back like a traditional toe-kick in a kitchen set-up.


Since we have 5" baseboard all throughout the house we built the base for the cabinets to sit on just slightly smaller than 5". This way...the baseboards would completely cover the base plus slightly overlap the bottom edge of the cabinets. I think we ended up going with a 2x4 and 1x2 turned on its side to achieve the height we needed.


We also ran a 2x4 along the back wall of the living room - secured into the studs - to bump the cabinets out away from the wall about 2". We did this for a few reasons...the first was so that we could easily secure the cabinets to the 2x4 (which was already secured to the studs) so we didn't have to worry about hitting studs if we had secured the cabinets directly to the wall. The second reason we did this was because bumping the cabinets out from the wall 2" allows the bookshelves up top to be recessed a bit. With the 2" bump out the counter becomes 15" deep (12" cabs + 2" bump out + 1" overhang = 15" counter) giving a little extra counter space up top and an overall better "built-in" look.


What came next was probably by far the hardest part of the entire install. So glad it's over and so glad we both still love each other after the fact - ha!

To install the cabinets we started with the base we had built on the ground, set each cabinet on top, and began securing the cabinets to the 2x4 along the back wall all while making sure everything was level and plum - using shims where necessary (omg - so many shims). The first cabinet was pretty easy and straightforward - it was secured to the side wall, the back wall, the base, AND the adjoining cabinet. It did however, get more difficult with every cabinet we added to ensure that the unit as a whole was level and plum. We had to use quite a few shims along the back wall because our wall is not perfectly straight (what wall is?) and we also shimmed the base quite a bit because our floor slopes down pretty bad in that area too. Other than that...we secured the hell out of these cabinets: to the back wall, the base, and the adjoining cabinet(s) - they aren't going anywhere!

Below is the side view - right after we installed the cabinets and getting ready to add baseboard. This area got covered up with a project panel so you'd never know we're cheating the depth by 2".


A couple things I should probably mention - we did not secure the base to the floor at all. I didn't want to drill holes into perfectly good flooring in case a future owner wanted to come in and rip it out and then be left with holes. We could've secured the base to the side wall if we wanted to but determined that the sheer weight of all the cabinets plus bookshelves up top would prevent this thing from going anywhere.

We also made sure to measure and cut out holes in the back of a few cabinets so that we had access to any outlets along the wall. We did this before securing the cabinet so if we had to make any adjustments, it was easier to do.

Once all the cabinets were installed and secured - we focused on the top or the "counter" portion of the built in.

I knew going in that this would be the portion of the project that would be our biggest hang up. We built a 13 ft cabinet but finding a 13 ft topper would prove to be either very difficult, very expensive, or both. SPOILER ALERT: it's both.

One of the tutorials that I referenced above used a single piece of butcher block for affordability and while butcher block is affordable, a 13 ft length was still a few hundred dollars and more than I wanted to spend. Plus...I didn't want a stained top. I wanted an all white top to achieve the look of this project. Except they were working with pre-fab Ikea cabinets and didn't need a top like we did.

So after procrastinating about it way too long, we decided to make our own. We chose a high quality, paint grade, birch plywood and seamed 2 smaller pieces together to make one massive counter top that could be painted to match the rest of the cabinets. We purchased the plywood from Home Depot and had them rip it down to size in the store.

 
Here's my handy helper:
 
 
I'd tell you how we seamed the 2 pieces together but we aren't wood workers and our approach is probably embarrassingly incorrect. We attached flat brackets on the underside for support and we used birch veneer tape on the edge of the plywood top to give it a nice finished look. We also made sure to fill, sand, and plane the top seam to make it look like 1 long piece of wood vs 2 pieces stuck together. No one but us will know (and now too you I guess) that we took the cheap way out: the cost of a single sheet of high quality plywood - $50!


To wrap up where we're at now, the cabinets and top have been painted white, we attached the top to the cabinets using construction adhesive and installed some pretty gold hardware - a well deserved splurge since we saved thousands doing this ourselves.


Next up: bookshelves, shiplap, and trim!

Here's to hoping it doesn't take another year to knock this out...


Thursday, March 24, 2016

A Whole-House To-Do List


Buying a new house has really put my creative mojo into over-drive. I eat, sleep, and breathe this house! I sorta have tunnel vision – and I sorta love it. #sorrynotsorry

The problem? I have post-it notes floating around the bottom of my purse with crude drawings and random measurements – and when I find the post-it a week later, I can’t even recall what it is or what my thought was at that moment! I’m so overwhelmed with what needs to get done vs what I’d like to get done that I’m constantly ping-ponging back and forth between spaces. I just might get whiplash. It’s so bad you guys.

I figured it was a good time to put together a whole-house to-do list to corral all my ideas and blue sky dreams for each space in one place. I love the idea of being able to update as we go along – because we all know that I’ll change my mind 50 times or more before we’re done here. Plus! Who doesn’t love checking things off an old fashioned to-do list? No better way to make a girl (or guy) feel like we actually accomplished something other than binge watching Netflix all day weekend! #iswearitwasntme #okmaybeitwas

I’ll be sharing the to-do list here on the blog...it's just a massive brain-dump at the moment but I plan to update this post as things change or get completed (yippee!) as well as link to the corresponding post so be sure to check back often.

If you’re a nerd and love lists like me – then you’ll love today’s blog! Ready?

Whole House

· Remove tile / carpet and replace flooring ev.er.y.where!
· Remove existing baseboards and install new “beefy” baseboards
· Install new crown molding? (we have vents that were installed close to the ceiling line so we’re           unsure how crown will look)
· Trim out all doors and windows
· New hardware throughout!
· Paint! And paint some more!

Entryway


To-Do:

· Create storage for coats, jackets, bags – hooks? slim wall mounted shoe storage – like this?
· Add board & batten? Picture frame trim/molding?
· Paint interior of front door & add decorative trim
· Add art
· Find flush mount light fixture
· Find a vintage runner

Living Room


To-Do:

· DIY / have cabinet built to house TV – add electrical for TV & media components
· Style built-in
· Get black/white rug professionally cleaned
· Find 9x12 rug to layer under current rug
· Replace ceiling fan – new/updated ceiling fan? Purchase/DIY light fixture instead?
· Install in-ceiling audio speakers
· Sell old coffee table / buy new coffee table
· Bring in additional seating
· Art above couch

Dining Room


To-Do:

· Replace chandelier – buy or DIY?
· Remove vertical blinds
· Bring in curtains – curtains + bamboo shades or just panels?
· To rug or not to rug?
· Find head chairs – ghost chairs? molded plastic chairs?
· Paint window casing? (can this be done?)

Kitchen


To-Do:

· Remove uppers on stove wall – we’ll live w/ these empty for a while to see if we can survive!
· Paint cabinetry
· Add hardware
· Resurface sink?
· Re-plate faucet?
· Find a vintage rug
· Add a bamboo shade
· Paint window casing? (can this be done?)
· Pimp out pantry
· Replace counter tops (2nd phase)
· Convert some cupboards to pull out drawers (2nd phase)
· Remove 2nd sink (2nd phase)
· Relocate dishwasher (2nd phase)
· Tile stove wall (2nd phase)
· Install open shelving (2nd phase)
· Buy all new appliances (2nd phase – except maybe a refrigerator)

Master Bedroom


To-Do:

· Sell old headboard / buy new
· Find / refinish nightstands – we have none!
· Close off 2nd doorway – prep for new master bath
· Demo both linen closets – prep for new master bath
· Reconfigure closet – Ikea Pax closet with a “built-in” look
· Bring in drapery
· Paint window casing? Or covert window to walk-out French doors (needs HOA approval)
· Find a vintage or vintage looking rug – sorta loving this one
· Figure out the dresser situation – do we need it?
· TV or no TV? – I say no!
· Add additional can lights or add a fixture to middle of the room
· Change out current double door entry to master bedroom to bigger set of doors
· Add new doorway for new bathroom entry

Master Bath


To-Do:

· Complete master bath “resurfacing” – new floors, paint, vanity backsplash, re-tile shower
· New toilet
· Close off hallway to bath to become a part of new master bathroom – hallway will create a vestibule   for new bathroom door and additional space for a double vanity
· Remove hallway ceiling soffit
· Add double vanity – reuse existing vanity in guest bath?
· Remove soffit above shower (if possible)
· Add shower door
· Add open shelving

Bedroom #2 


To-Do:

· DIY raised molding on door
· Remove soffit (if possible)
· New closet doors – new closet system
· Paint window casing?
· Bring in drapery
· DIY floating shelves opposite bed
· Add overhead lighting
· Daybed? Refinish bed frame in storage?
· New bedding & rug – inspiration here
· Paint ceiling a fun/bold color? Giant chalkboard wall?

Bedroom #3 – Office


To-Do:

· DIY raised molding on door
· Close off opening to sunroom or put doors back on
· New closet doors
· Add overhead lighting

Guest Bath


To-Do:

· DIY raised molding on door
· Complete guest bath “resurfacing” – new floors, paint, re-tile tub wall – think fun colors!
· New toilet
· Remove old tub insert / add new
· Reuse master bath vanity? (paint & new sink/counter top/hardware)
· Trough sink! Every child’s dream?
· Wall mount double faucets?
· New mirror
· Remove towel bars for kid friendly towel hooks

Hallway between Bedrooms 2 & 3


To-Do:

· Replace old electrical panel
· Find flush mount light fixture
· Gallery hallway?

Sunroom


To-Do:

· Accentuate beams – paint? wood wrap?
· Create kids / craft area in the left corner after opening from 3rd bedroom is closed off
· Create workstation just outside master bedroom
· Bring me all the plants! I got my eye on you Fiddle leaf fig!

Laundry Closet


To-Do:

· Replace water heater with tank less
· Stack or not to stack washer/dryer?
· DIY counter top for folding/sorting
· New cabinets or re-use kitchen uppers
· Find a place for the kitty litter

Deck

To-Do:

· DIY wrap around couch
· BBQ station
· Green space? Putting green? (it’s seriously that big!) 


As you can see we've got a lot of work ahead of us and not many things crossed off the list...eeek! It's sorta gives me anxiety seeing it all in one place but I'm also really, really excited about all the work ahead too. Is that weird? For the very first time in my life I don't have to rush through any design decisions and can take my time getting it right (or wrong) because guess what?! This place is all ours and you'll have to drag me out by the hair because I'm not moving any time soon. Hear that S?!

Wednesday, March 23, 2016

How to Remove Baseboards


We’re finally all moved in but when I say “moved in” what I really mean is that we’re living with only the barest of necessities – our mattress/box spring on the floor, what little clothing the closets will hold, and the couch – although I’ll argue right now, that even the couch is unnecessary because after a full day of work, a night of demo, all we really care about is getting our aching bodies to bed!

It still feels so surreal that this is in fact – OUR HOME! #somebodypinchme

The rest of our belongings are being stored in the garage while we rip out the trim, baseboards, close off a doorway, widen another, and slap on a coat or twelve of paint in preparation for what will undoubtedly be the biggest improvement this place has seen in several years – new laminate flooring!

First order of business in a mile-long to-do list: removing the baseboards.

Aside from paint, adding thick, beefy baseboard and trim will without a doubt give you the biggest bang for your buck. Guaranteed. It’s an investment I will never regret and continue to make in every house we own after this.

The process to remove baseboards is actually quite simple and very straight forward. We had a general idea how to get-er-done but decided to watch a few You Tube videos beforehand just to help us feel extra confident going in.


Our house has 3 different styles/sizes of baseboards throughout (#iwishiwasjoking) but these steps will work regardless of what style or size baseboard you’re working with. But first – tools:

·         Gloves
·         Utility knife
·         Pry bar – (we used this one and this one)
·         Putty knife (optional)
·         Hammer or rubber mallet
·         Piece of scrap wood
·         Pliers (optional)


Step 1: Score

Using your utility knife, score along the entire top, bottom, and edges (where it meets the door trim) of the baseboard. This will help detach the baseboard from the wall a bit and score through any caulking that was used to fill any visible gaps after installation or numerous layers of paint over the years.


Step 2: Wedge

Starting at one end, use your mini pry bar or putty knife and wedge it into the top of your baseboard by hammering the tool with your hammer or rubber mallet into the top of the score line.


Step 3: Pry
Once the tool has been wedged down between the wall and baseboard you can pry the baseboard off the wall two different ways or a combination of the two. You can either pull the pry bar towards you and keep doing this all the way down the entire length – for extra-long runs of baseboard, we used the 2 pry bar method – one to use as we went along and the other to stick between wall and baseboard where we had just pried off to give us leverage and space between wall and baseboard going forward.

You can also pry the baseboard off by pushing your pry bar towards the wall – but always use a scrap piece of wood when you do this so as not to damage your walls, but to also evenly distribute the force across the piece of scrap wood.


If you didn’t score well enough the 1st time and notice that as you pry, you’re also peeling off layers of your sheet rock, go back and score those areas again or cut the base board away from the peeling wall.

Continue working your way down the entire length of baseboard, wedging and prying.


Step 4: Remove

Once the entire length of baseboard has been pried off the wall, now all you have to do is remove it. In some cases, you might have to tug, pull, wrestle with it to get it out of a tight spot but this is why wearing gloves is necessary! The baseboard should have been attached with a combination of caulk (along top/bottom seams) and nails so be careful of the nails when pulling the baseboard out.

Step 5: Clean-Up

 After your baseboard has been removed, there are still a few things left to do. You’ll want to remove any nails left along the baseboard line so that when you go to install new baseboards or re-install the ones you just removed they are able to sit flush against the wall. In some cases, you may need to scrape off the excess calking along the wall or floor where the baseboard was attached for the same reason. Since we’re installing bigger baseboards and removing the old tiles, we didn’t bother doing this.

If you’re planning to re-install your old baseboards, be sure to mark them with a corresponding number or location so that you know where they go when you re-install them.

Step 6: Take Pre-Caution

If you’re not planning to re-install your old baseboards, be sure to either remove all the nails from the baseboard with a hammer/pliers or bend them down. That way, anyone grabbing a pile of baseboards to discard isn’t getting nicked or poked by rogue nails. I’d also recommending taking a shop-vac to the perimeter to catch any stray nails or wood shards.


And that's it! It took us only a few hours to remove all the baseboards throughout the house and it was the first step in the bigger renovation plan we've got going on over here. Keep tabs on us via Instagram for real-time house updates and as always, check back here for the full progress reports as it happens! Thanks for stopping by and I'll be back again this week with our whole-house to-do list...and boy is it a long one.

Thursday, November 12, 2015

Fall for $20


Although the calendar indicates that Fall is officially here and underway, Southern California hasn't gotten the memo. It's still hot around these parts (we're flirting with the 80's) but temps have been dropping and I hope they continue to do so. There's no time of year I love more than Fall.
 
I usually break out the Fall / Halloween décor by late September / early October to really get into the spirit of things that this time of year brings but with everything we've been through over the last few months, I just haven't gotten around to it.
 
With Halloween almost here and Thanksgiving just around the corner, I wanted a quick and simple project that would sprinkle our home with those warm and cozy fall feelings without having to drag our décor bins from the depths of the black hole garage.
 
Buffalo check is all the rage right now and what perfect timing because this bold take on a classic plaid print is so fitting for the season. Ive been oogling over these gorgeous pillows but when I spotted a similar fabric at Ikea for a fraction of the cost, I picked up a yard on a whim and decided to make my own low-budget version.
 

If I've said it once, I'll say it again - pillows are the easiest way to change up the look and feel of a room in an instant without much of an investment. So with my Ikea fabric, I made two pillow covers in about 30 minutes start to finish all in an effort of infusing a little fall coziness into our main living space.
 
I've done my fair share of sewing but usually just ask my super-sewer Mom to make my pillow covers for me instead of bothering to do it myself. But these ones? They're all me! Even someone with the most basic of sewing skills could whip these up, no problem!
 
With a little direction from my Mom, I made two super simple envelope style pillow covers out of 1 yard of fabric. The Internet (and Pinterest) is flooded with tutorials for this type of DIY so I won't bore you with another - just click here and use any one of these tutorials to make your own.
 
But how about a few helpful hints before you dive right in?
 
#1 - Always remember to make your cover smaller than your pillow insert. This may seem illogical but it's the most important thing I've learned and the key to getting the fullest pillows! A general rule of thumb is to make your cover 2" smaller than your pillow insert. For example: if your inserts measure 20" x 20", you'll want to make your pillow cover a finished size of 18" x 18". Be sure to account for your seams when cutting your fabric!
 
#2 - Reinforce the seams where the two back flaps of your cover overlap. When you're stuff your cover with the insert, that area will have the most stress put on it from all the pushing, pulling, and re-arranging your insert. Having a reinforced seam will make sure that your cover doesn't literally rip at the seams.
 
With those tips in mind, after my covers were sewn, I gave them a quick press with the iron just to iron out any wrinkles and to press the seams. But I didn't stop there. I decided to add a few yarn pom-poms to each corner of the pillow because nothing says fall like a good plaid and some cozy textures!
 
To make the over sized pom-poms you'll need:
  1. Yarn
  2. Scissors
  3. Steel yarn needle
I started by wrapping the yarn around 4 of my outstretched fingers like so:
 
I wrapped the yarn loosely around my fingers approximately 70 times until my bundle was pretty thick. The same technique can be used around less fingers or wrapped around fewer times to achieve a smaller pom-pom too.
 
There are several tools out there that you can buy to assist you in making pom-poms but I didn't have any of them so I improvised and used my fingers instead which seemed to work out just fine.
 
Once I wrapped the yarn around a sufficient amount of times, I carefully slid the bundle off my fingers and laid it in the center of a 12" piece of yarn that I had previously cut.
 
With the single piece of yarn, I tied a knot in the middle of my bundle and then flipped it over and tied a second knot.
 
With the tied bundle, I slid my scissors through the loops on either end and cut - careful not to cut the center tie.
 
After cutting all the loops on either end you can choose to trim your pom-pom for a more uniform look or leave it as is.
 
Once I had all my pom-poms made, I used a steel yarn needle threaded with a length of yarn and sewed each pom-pom to the corner of my covers. Easy-peasy!
 
Ready to see the final result?


How cozy are these pillows? And what a big difference they make! Not too shabby for $20, right?!


Gimme all the heart eye emojis...I think I'm in love! Are you too? Please tell me you agree!
 

Thursday, November 5, 2015

Plant Pots and Paint Pens

Say that 10x fast!

As I mentioned at the end of this post, I’m slowly trying to ease my way back into the blog and chip away at all those projects we put on the back burner for a bit. While we’re still knee deep in the raw every day emotions of this new life we’re adjusting to, staying busy helps.

Outside of this blog I work a regular ol’ 9-5 except instead of 5 – 8 hour days, I work 4 – 10 hour days with every Monday off. Having Mondays off is great! While everyone else in the world is at work, I’m able to accomplish a whole lot of blog related stuff and tackle a few projects around the house unless I turn on the TV and get sucked into a Gilmore Girls marathon – then all productivity goes out the window. Over the last few months, that sorta became the norm as I wasn’t very mobile towards the end but I’m slowly redirecting my focus and I have to say that it feels good.

This last Monday was a very productive one after many, many unproductive ones. I worked on and/or completed 5 new projects – all of which I’ll be sharing here sooner or later. High fives for me!

This first one is more so a facelift than it is a project and takes zero skills whatsoever. One of the things I love most about decorating is incorporating live plants into every room. I think plants just brighten up the space and when you add any sort of natural element it just brings the room to life. Unfortunately for me, I totally suck at keeping anything alive. That’s why I always tend to gravitate towards low maintenance plants – usually of the succulent variety. But even I’ve managed to kill quite a few of those too. Most recently I killed a snake plant…or most of it…which is considered to be virtually indestructible. #GOme. I think I have a chronic case of over-watering but I’m working on it.

I woke up one morning to find that 95% of my snake plant was water logged and the stalks were falling over, so after feeling like such a failure, I removed the dying stalks and was left with a whopping 3 stalks. Sure made for a wimpy plant. So while I’m trying to bring it back to life, I went to Home Depot and brought home my next victim and plopped it in the pot that the previous one vacated.

Except the pot totally sucks. Just like my plant caring abilities. It was just a plain white ceramic pot I picked up from Ikea and thought that maybe…just maybe…if I jazzed up the pot a bit the plant would last longer. #Ainthappening. But I went ahead and did it anyways because that’s how my crazy mind works. I could use all the help I can get.


The ceramic pot already had some raised detailing so I just took a paint pen and enhanced the details. Looks like a totally different pot – and much more expensive too might I add! Don’t you agree?


Here's a side by side:


And the best part? You don’t have to have these pots with raised details from Ikea to achieve the same look. Any plain ceramic, or terra cotta pot too for that matter, can be transformed with a paint pen and free-handing a super simple pattern…think dots, crosshatch, grids – the options are endless!

So what do you say? Think this super cute pot will help keep my plant alive? Probably not but #Onecanhope.

Friday, April 10, 2015

Upcycled Resin Coasters

Last summer my boyfriend and I took a quick weekend trip to Las Vegas and while we were there we stayed at the newly renovated SLS Hotel which was once the Sahara Hotel many years ago. When we went last summer the hotel had only been open for a few weeks and while it wasn't on the main stretch of Las Vegas Blvd among all the hub-bub, or an uber fancy hotel at that, for the price, we weren't opposed to staying somewhere new and decided to give it a shot.

For those of you that don't know, because I certainly didn't, the SLS is a boutique style hotel with hotels in any major cities around the country such as Beverly Hills and Miami, and as of last summer, Las Vegas. What I didn't know about the hotel brand, but thoroughly enjoyed, is that their mascot is a super cute monkey. All throughout the hotel room they had notepads, laundry bags, pens, all adorned with their monkey mascot. How very cute and chic all at the same time.

All weekend long I snapped pictures of the hotel décor (all bloggers do this right?), the chandeliers, the bathrooms, the monkey paraphernalia, and by the end of the short stay, I had fallen hard for this monkey. Weird, I know. He was totally cute (and he's totally a he), while still being very chic and gave off that Hollywood Regency vibe which I totally love. As we were packing up and as our weekend was ending, I desperately wanted to bring a little piece of the SLS back home so I gathered up all the free monkey emblazoned notepads, pens, and laundry bags. Yes. Yes, I totally did. #dontjudge

My boyfriend...the man I love so much because he doesn't even bat an eye as I'm greedily shoveling all the monkey trinkets into my bag, points at the mini bar and says "you forgot the coasters". Coasters!!! Holy jackpot Batman! I snatched those up in a hot second and man...I'm sure I did! They're the shining star of today's totally rad DIY that I schemed up.


Since our trip to the SLS last summer I've been hoarding these coasters like they were gold just waiting for the perfect opportunity to use them some way, somehow. I refrained from using them right away because I knew that with them being made out of the same material as your standard cheap-o bar coasters, they'd be ruined and water stained in no time. If I wanted to keep them intact, I'd have to brainstorm up a more permanent solution.

My ah-ha moment came after perusing the aisles of Home Depot. I've always been fascinated with resin for its clear yet solid finish but have always been a little hesitant to give it a try. Until now! I knew that using resin to seal, protect, while still being able to enjoy the adorable monkey figure on the coasters was the perfect permanent solution I was looking for. I picked up some resin (this kit actually) and gathered the rest of my supplies. Luckily I had everything else I needed on hand so the upfront cost was minimal.

Here are all the supplies I used to complete this project:


I decided that the monkey coasters needed some additional backing...mainly to beef it up so that the painters tape had something more to adhere to. My original thought was to back them with cork, and I still might do that, but I couldn't find any plain cork coasters that didn't cost an outrageous amount of money (seriously...it's only cork people!) and I was too impatient to order something online and wait for it to arrive. #patience is not a virtue
My solution came during my recent coffee table organizational effort. I found these old Halloween themed cardboard coasters which were water stained and instead of tossing them, I knew I could use them to beef up my cutie monkey coasters.


To adhere the Halloween coasters to the monkey coasters, I used Aleen's tacky spray glue and sprayed a good amount on the Halloween design (the backside is just plain white) then just placed the monkey coaster, monkey side up, right on top of the glue and allowed the glue to take hold.


After the glue had taken hold, I wrapped each coaster with blue painters tape. I did wrap the coasters in such a way that there was an overhang of tape on the bottom of the coaster that I then folded down. The painters tape will act as a barrier for the resin and allow the same to take form.


Next, I mixed up a batch of resin according to the directions on the box. All kits may vary so follow the directions on the kit you have before moving on to the next step.

With the resin mixed, I placed all my coasters on a cookie sheet in case there was any leakage and poured the resin into each form. I did my best to make sure each coaster was the same thickness but it was hard to be accurate so I just eyeballed it. While I poured the resin a few air bubbles formed at the top of the surface but the directions in the kit suggested blowing lightly on the surface to eliminate the bubbles.


Once the resin was poured the hardest part was waiting the full 24 hour cure time before I could see how they turned out!
After waiting the allotted cure time, they were almost done! To finish them off, I took a fine grit sand paper and lightly sanded the edges to get rid of the inconsistencies of height from my pour.
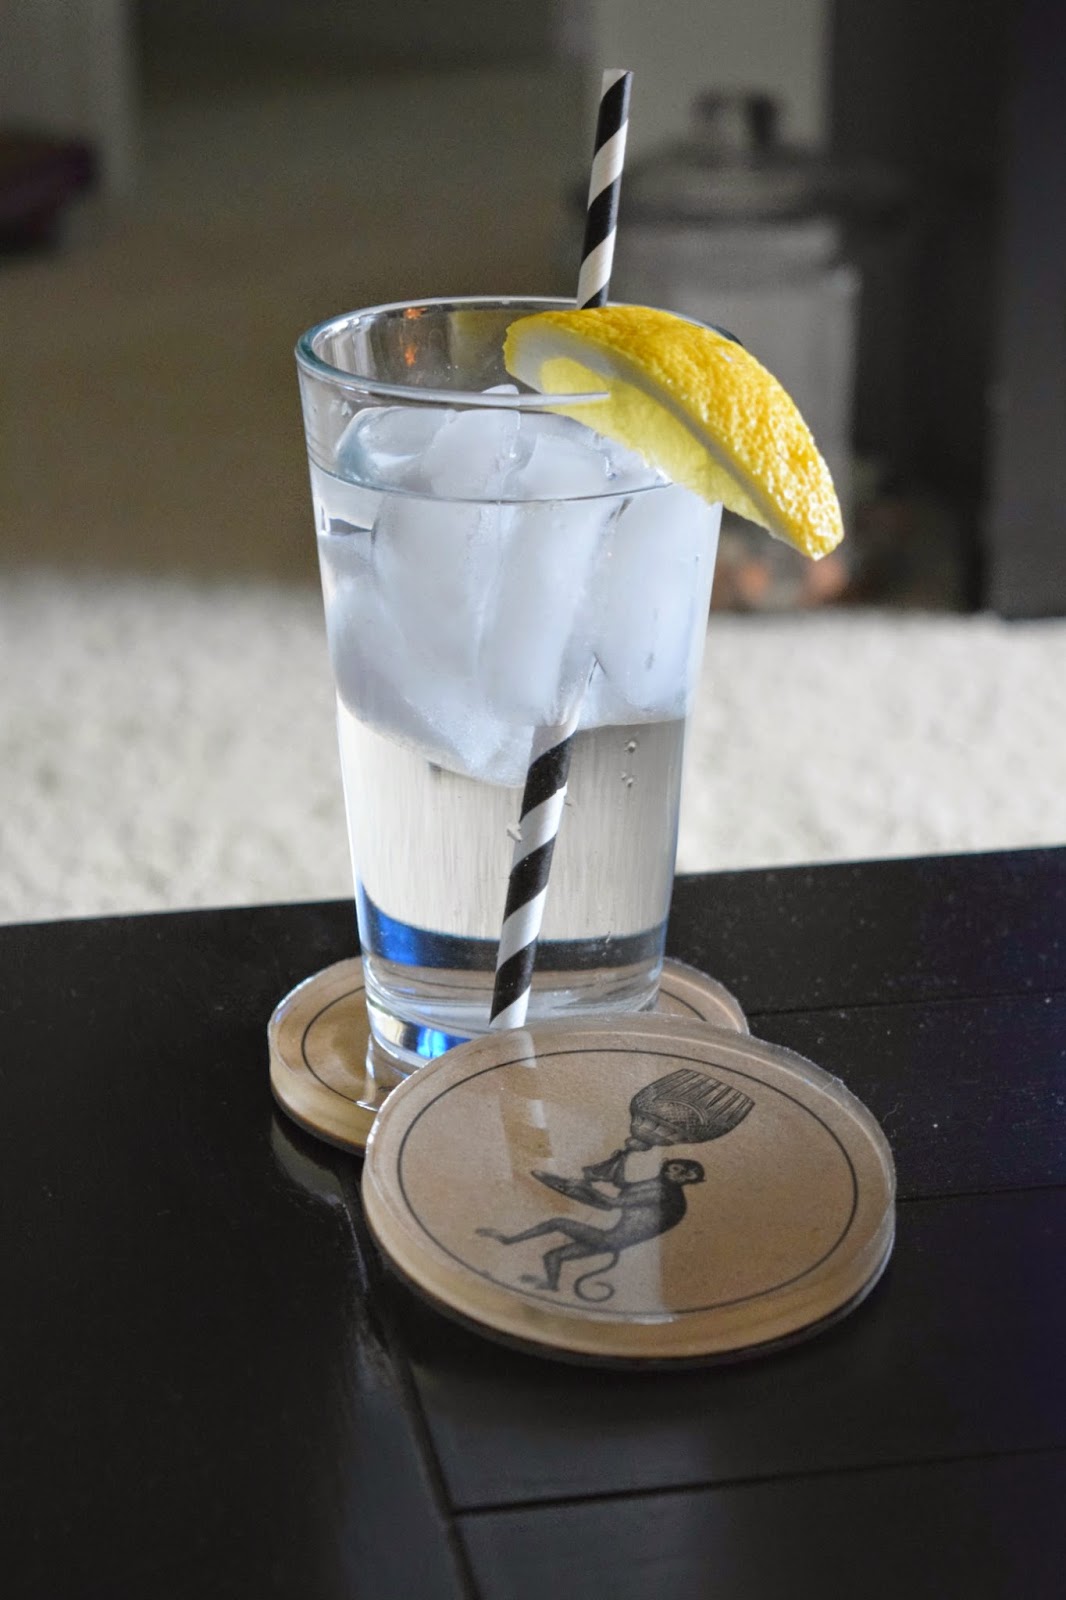
Ready to see how they turned out?

The resin changed the color of the coaster over all from a creamy white to an almost coffee stained brown but I don't mind. I love it so much more! We keep the coasters in this ceramic jar that sits on our coffee table. Perfect for easy access!


So we've determined that they look good, but do they work good?

They do! As the glass sweats, the coaster collects the water instead of it spilling over onto the table. I'm so happy with this little DIY and so glad I snagged those free coasters from the mini bar!


Isn't my little monkey friend the cutest?


Pretty simple right? Now....what else can I use resin for?! Decisions, decisions.