Showing posts with label livingroom. Show all posts

Thursday, June 18, 2015

Living Room Cha-cha-changes

I've been making a few changes to our main living space and am dropping in today to share the first of many minor tweaks that have been happening over the last few weeks.
 
I've been eager to infuse a little more color into our normally neutral living room for quite some time and one of the easiest and most cost effective ways to do that is through pillows. It's so easy and convenient to change out your pillows throughout the season or hey...just because! I'm a known hoarder of pillows and can always be found perusing the pillow aisles at any home décor store. One of the greatest things about having a mainly neutral base is that it makes adding color on a whim, so easy!
 
 
I picked these vibrant blue floral motif pillows up at HomeGoods and I think they're the perfect counterpart to the darker navy curtains while boldly standing out against the neutral backdrop of the couch.
 
 
I'm loving these new pillows so much and think they bring in the perfect amount of color for summer.
 
 
What do you think? Do you love HomeGoods as much as this girl does? Have you ever switched out your pillows for an instant change or for a quick living room face lift? How are you infusing color into your home this Summer?
 
Be sure to check back soon for the other living room changes we've made over the last few weeks! I'm so excited for you all to see!
 

Friday, April 10, 2015

Upcycled Resin Coasters

Last summer my boyfriend and I took a quick weekend trip to Las Vegas and while we were there we stayed at the newly renovated SLS Hotel which was once the Sahara Hotel many years ago. When we went last summer the hotel had only been open for a few weeks and while it wasn't on the main stretch of Las Vegas Blvd among all the hub-bub, or an uber fancy hotel at that, for the price, we weren't opposed to staying somewhere new and decided to give it a shot.

For those of you that don't know, because I certainly didn't, the SLS is a boutique style hotel with hotels in any major cities around the country such as Beverly Hills and Miami, and as of last summer, Las Vegas. What I didn't know about the hotel brand, but thoroughly enjoyed, is that their mascot is a super cute monkey. All throughout the hotel room they had notepads, laundry bags, pens, all adorned with their monkey mascot. How very cute and chic all at the same time.

All weekend long I snapped pictures of the hotel décor (all bloggers do this right?), the chandeliers, the bathrooms, the monkey paraphernalia, and by the end of the short stay, I had fallen hard for this monkey. Weird, I know. He was totally cute (and he's totally a he), while still being very chic and gave off that Hollywood Regency vibe which I totally love. As we were packing up and as our weekend was ending, I desperately wanted to bring a little piece of the SLS back home so I gathered up all the free monkey emblazoned notepads, pens, and laundry bags. Yes. Yes, I totally did. #dontjudge

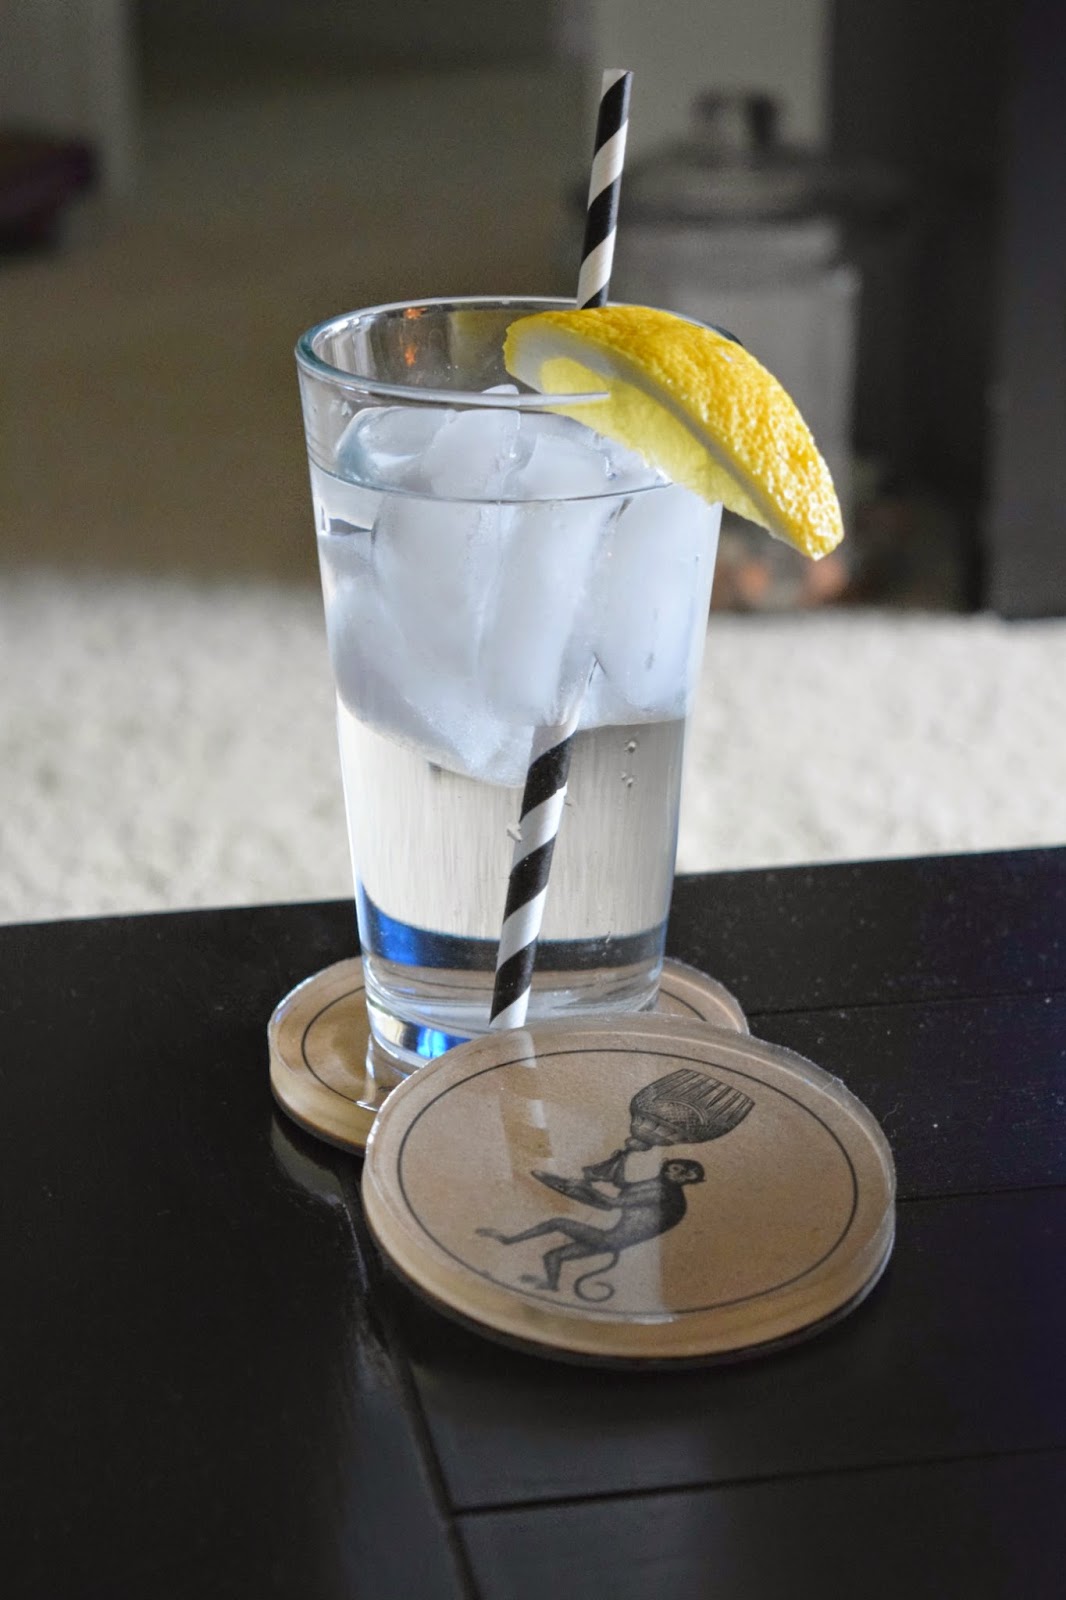
My boyfriend...the man I love so much because he doesn't even bat an eye as I'm greedily shoveling all the monkey trinkets into my bag, points at the mini bar and says "you forgot the coasters". Coasters!!! Holy jackpot Batman! I snatched those up in a hot second and man...I'm sure I did! They're the shining star of today's totally rad DIY that I schemed up.


Since our trip to the SLS last summer I've been hoarding these coasters like they were gold just waiting for the perfect opportunity to use them some way, somehow. I refrained from using them right away because I knew that with them being made out of the same material as your standard cheap-o bar coasters, they'd be ruined and water stained in no time. If I wanted to keep them intact, I'd have to brainstorm up a more permanent solution.

My ah-ha moment came after perusing the aisles of Home Depot. I've always been fascinated with resin for its clear yet solid finish but have always been a little hesitant to give it a try. Until now! I knew that using resin to seal, protect, while still being able to enjoy the adorable monkey figure on the coasters was the perfect permanent solution I was looking for. I picked up some resin (this kit actually) and gathered the rest of my supplies. Luckily I had everything else I needed on hand so the upfront cost was minimal.

Here are all the supplies I used to complete this project:


I decided that the monkey coasters needed some additional backing...mainly to beef it up so that the painters tape had something more to adhere to. My original thought was to back them with cork, and I still might do that, but I couldn't find any plain cork coasters that didn't cost an outrageous amount of money (seriously...it's only cork people!) and I was too impatient to order something online and wait for it to arrive. #patience is not a virtue
My solution came during my recent coffee table organizational effort. I found these old Halloween themed cardboard coasters which were water stained and instead of tossing them, I knew I could use them to beef up my cutie monkey coasters.


To adhere the Halloween coasters to the monkey coasters, I used Aleen's tacky spray glue and sprayed a good amount on the Halloween design (the backside is just plain white) then just placed the monkey coaster, monkey side up, right on top of the glue and allowed the glue to take hold.


After the glue had taken hold, I wrapped each coaster with blue painters tape. I did wrap the coasters in such a way that there was an overhang of tape on the bottom of the coaster that I then folded down. The painters tape will act as a barrier for the resin and allow the same to take form.


Next, I mixed up a batch of resin according to the directions on the box. All kits may vary so follow the directions on the kit you have before moving on to the next step.

With the resin mixed, I placed all my coasters on a cookie sheet in case there was any leakage and poured the resin into each form. I did my best to make sure each coaster was the same thickness but it was hard to be accurate so I just eyeballed it. While I poured the resin a few air bubbles formed at the top of the surface but the directions in the kit suggested blowing lightly on the surface to eliminate the bubbles.


Once the resin was poured the hardest part was waiting the full 24 hour cure time before I could see how they turned out!
After waiting the allotted cure time, they were almost done! To finish them off, I took a fine grit sand paper and lightly sanded the edges to get rid of the inconsistencies of height from my pour.
Ready to see how they turned out?

The resin changed the color of the coaster over all from a creamy white to an almost coffee stained brown but I don't mind. I love it so much more! We keep the coasters in this ceramic jar that sits on our coffee table. Perfect for easy access!


So we've determined that they look good, but do they work good?

They do! As the glass sweats, the coaster collects the water instead of it spilling over onto the table. I'm so happy with this little DIY and so glad I snagged those free coasters from the mini bar!


Isn't my little monkey friend the cutest?


Pretty simple right? Now....what else can I use resin for?! Decisions, decisions.


Tuesday, March 24, 2015

Garden Stool End Table

One of the things I love the most is when a project is easy, it takes very little time, and it requires very little moo-la. This past weekend I worked on a bunch of small projects that didn't take too much of my time and by the end of the weekend I felt like I had accomplished so much! Don't you love it when that happens?! I know I sure do.
 
Let's talk couches for a second, shall we?
 
 Did you know that the average couch measures anywhere from 6-8 feet long? Our couch measures just over 11 feet! That means our ginormous couch far surpasses the average by a third! When we moved into our previous apartment, the main wall was a whopping 16 feet long!!! Both the couches we had previously owned prior were worn, dated, and just looked disproportionate up against the massive wall. So...we went couch shopping, found a great no-interest for 16 months deal, and purchased this 11 foot beast. We paid it off in 12 months thanks to my financially smart guy and it really is the most comfortable couch in all the land. What we didn't anticipate or take into consideration (our bad) was if/when we ever moved (which we eventually did) and how this massive couch would dictate which apartments we could/could not live in.  Our apartment search was brutal. All because of a stupid couch. We looked at and had to turn down so many other apartment communities all because the main living area didn't have a space large enough to accommodate our couch. #lessonlearned
 
All in all everything worked out, as most things do, and we decided (settled?) on the apartment we're in now. Our couch barely fits along the main wall, but hey...it fits. Which brings me to the project I'm blogging about today.
 
The main wall in our current apartment is approx. 13 feet long. Our couch clocks in at a tad over 11 feet. Which means that on either end of the couch I have about a foot of space to work with, if that. Immediately after moving in and placing the couch, I realized that end tables just weren't going to work. Bummer dude. I tried shoving the couch to one side and having an end table on the other but then my OCD kicked in and I just wasn't having it. Out went the tables.
 
Last summer I was in HomeGoods and found myself in the garden section when I spotted the solution to all my problems. Garden stools. The new end table for small spaces. They're small, compact, they offer a flat surface albeit a small surface, but hey, beggars cant be choosers so into my cart it went and decided to give it a whirl. The only problem? It was green. Mean green.
 
See?
 
 
Didn't exactly go with my black, white, grey, navy color scheme I have going on. But nothing a couple new pillows with some green couldn't fix, right? Right!
 
Well...not so fast.
 
I searched. I scoured. I came up empty handed. There are a ton of pillow options out there but none that I absolutely loved that would help make this green little stool apart of the family. So it's sat here in the living room just waiting. Until now.
 
I'm working on the lamp situation too...in case you're wondering. No side tables, no table lamps = it's a hard life.
 
I found the perfect pillows but the green would have to go. Nothing a little spray paint cant fix! I tell ya, pillows and spray paint can solve just about any decorating dilemma! This mean green garden stool not only got a fresh coat of paint, it also got a tabletop! Wanna see?


I ordered a plain pine wood table top online because I couldn't find one the perfect size at any local hardware or hobby store. It cost me less than $10. I followed the same steps to stain the tabletop as I discussed in this previous blog post and it turned out great!

 
Once the top was stained in my favorite Walnut stain, the garden stool got a few coats of Rustoleum's Candy Pink in Gloss.


Originally my initial thought was to permanently adhere the table top to the garden stool but then I decided against it. If ever down the line I want to repaint the stool or actually use it in a garden some day, I'd be wishing for an easy way to remove the top and restore the stool to it's natural state. That's when I had my little light bulb moment and decided to attach the top using my forever favorite command adhesive strips.

Worked like a charm!


The pink may seem odd now, but it will when I show you the recent changes to the living room, it'll all make sense. My uber supportive boyfriend didn't even flinch a muscle at the pink. What a keeper!
 
 
The table is a lot more functional now than it ever was and can now hold drinks without the fear of them toppling over from sitting on an uneven surface. For a little over $10, this quick little DIY project solved our space issue just perfectly.
 
I always love finding ways to use things in unexpected ways or to use them in ways in which they weren't originally intended. This project personifies that to a "T"!
 
Did any of you purchase a giant couch and had to forgo end tables because of it? What did you do to solve that dilemma? Do tell!

Monday, March 9, 2015

Look for Less - Spring Living Room Edition

 
Spring is just around the corner and I'm loving all the pops of color and floral prints plastered all over the blogs and Pinterest. I'm eager to incorporate a little bit of Spring into my living room but until I do, this living room caught my eye:
 
I love the teals, pinks, and crisp whites all while feeling cozy, eclectically gathered, and collected. This living room totally screams "spring" to me in all the best ways possible.
 
I searched the Internet for the original source of this living room but was left empty handed so if you know who I should credit, please let me know and I'll be happy to do so! Since I wasn't able to find the original source for this living room, I really have no idea where any of these furnishings came from but often times I see gorgeous rooms and they just look lavishly expensive. And while I'd give my right arm, and probably my left, to live in one of those pin-worthy homes, this girl on a budget just doesn't have the cha-ching to be as fortunate.
 
So what do I do? I do what I do best! One of my favorite things to do is to take an inspirational image like the one above and recreate it for the girl on a budget (aka me!). It's so fun to see something you love, but probably can't afford, and find something similar for much, much cheaper. Great design doesn't have to be expensive! That's the absolute best part!
Wanna see my rendition? Take a look and see:
Source List: 
Chevron Drapes - H&M Home - $24.95 for the pair
Round Mirror - Ikea - $14.99
Teal Tufted Sofa - World Market - Reg $699.00 (this was just on sale for $499!!)
White & Blue Polka Dot Pillows - Etsy - $60.00 for the pair
Floral Pillows - Wayfair - $106.00 for the pair
Coffee Table - Target - $135.99
Blue Vases - World Market - $14.94
8x5 Rug - Rugs USA - $86.00 (currently on sale for 75% off)
Art - Etsy / Minted / Artfully Walls - Approx $25.00 ea
White Sofa Table - Ikea - $199.00
Lamp - Target - $39.00
 
Total Cost: $1454.87

Here's the side by side:


Not exact, but pretty darn close, no? I love that the re-created look has the same vibe, and colorful spirit as the inspirational image all while standing on it's own.
 
It was so much fun trying to re-create this spring living room look with items I found on the cheap. And the best part? A lot of these retailers offer sales all-the-time so any of these items can be purchased even cheaper! But a living room for less than $1500.00? I'd say that's  job well done, don't you?


Friday, February 27, 2015

Cut The Clutter - Coffee Table Clean-Out

In an effort to clean and organize all our spaces and rid our apartment of the clutter we accumulated in 2014, I started down the road of cutting the clutter last month and it's been full steam ahead ever since!
 
You may recall that I tackled our entryway closet earlier this year and since taking on that project and seeing how effective having a clutter-free space has been for us, I started in on another un-organized thorn in our side: the coffee table.
 
Our hand-me-down coffee table that I've had for over 5 years has 4 generous sized drawers and while I'm grateful for the storage space, we definitely didn't utilize it properly...until now! Space is such a premium in our apartment and I've learned that in order to maximize on every bit of valuable real estate, everything we choose to keep in our apartment must have a designated space because when it doesn't, this is what happens:


We don't have a huge kitchen that affords us the luxury of a "junk drawer" so instead, the coffee table drawers have become our catch all for all the junk. There was too much junk in the trunk and it was time for the junk to go!
 
Like I did with the closet, the first thing I did was empty everything out and sort like items into piles so I could see what I was working with and how many bins I'd need to corral all this madness.
 
 
Side note...is 7 rolls of tape really necessary? Looks like in an effort to find one roll of tape, I bought 6 extras. Guess that's what happens when your coffee table is bursting at the seams and finding anything, let alone tape, is next to impossible.
 
After I sorted everything out, threw away the trash, I realized that a lot of what had accumulated in the coffee table were items that were simply misplaced and belonged elsewhere. So after re-directing those items to their correct homes, I was able to see what I was working with and  headed to the dollar store to pick up some bins. The bottom drawers of our coffee table are pretty deep so finding bins for the bottom drawers wasn't all that hard however the top drawers are pretty shallow so I decided to forgo bins all together. All in all I needed 13 bins for both bottom drawers.

One of the things I learned through my last attempt at employing some storage bins in these drawers is that when the bins don't fill the entire space, it's easy for the drawers to end up in chaos. With too much free space between the bins, the easier it is to just throw things anywhere! When the bins fill all the available space, you're almost forced to put the item back where it belongs.

So without further adieu...
 
Here she looks all decked out in all her organized glory!! (guess I just decided my coffee table is a she now)
 
 
I decided on 8 bins for the right drawer and 5 for the left. After determining homes for all the contents of the coffee to the new bins, I decided to take it up another notch.
 
I used some card stock that I had on hand, traced the bottom of each bin onto the paper, cut out the card stock and placed the decorative paper in the bottom of the bin.
 
 
Taking the couple extra minutes to pretty up the bins really goes a long way. When it's not only organized, but it looks good too, I feel as if you're more inclined to keep it that way and for only a couple extra bucks, you really can't beat the cuteness of it all!
 
All in all, I'd say this coffee table, or junk table, was a total success and it feels so good to have another organized space checked off the list! How's this for a before and after:
 
With everything assigned a new home, we have no need to use the top drawers although I could see these top drawers turning into storage for envelops or shipping supplies, but for now, they're as empty as can be!
 
For less than $20, I'm so happy with the end result and this coffee table is no longer a thorn in my side!