Showing posts with label organize. Show all posts

Thursday, December 3, 2015

The Entryway Re-do

The entryway in our apartment can hardly be called an entryway. It’s a 4’x3’ pint-sized speck of space that really has been useless…until now! Despite its small footprint, the functionality of this space really needed to pack a punch. An entryway in a home is probably one of the hardest working spaces a home can have. It’s the first space we encounter when we walk through the door and the place we unload our junk – think hats, jackets, bags, keys – just to name a few.

The problem with our entryway or lack thereof, is the tight spacing. The swing path of the front door is essentially all we have to work with. That’s it folks. We tried a few different options (as seen below) and even mocked some up in the past but none ever seemed to fit the bill when it came to functionality.


This shelf situation lasted the longest but probably only out of laziness or from being stumped as to how to solve the problem. Then one day I was just so fed up with it and took everything off the wall. As with most projects – starting with a blank slate is really the first step. It pushes the reset button on the space and allows my brain to reset too in terms of design. Without the distraction of “stuff” I hate staring back at me, I can start brainstorming on a solution that I’ll love in the end.

I patched all the holes and gave the wall a fresh coat of paint. Then I made a list of the issues.

Clutter was the #1 issue and biggest driving force behind the entryway re-do.  What I learned from the last time around that I tackled this space is that we’re not a family that can handle “open shelving”. Some are, some aren’t. We are definitely in the AREN’T category. Unless I constantly policed or tidied up the shelf, it was a constant catch all for “stuff”…receipts, business cards, candy and/or candy wrappers, change, pens, pencils…etc. It was a nightmare.

The 2nd biggest issue was ease of convenience. Over time I’ve found that unless it’s easy, kids and ahem…grown men, won’t use it. It was amazing to me how many times I found jackets strewn all over the house – on the couch, backs of chairs, on the floor (!!!!), when our coat closet was literally an arm’s reach away! Apparently small kids and grown men have trouble opening doors and reaching for a hanger to hang up their coats.

With all my issues written down, I set about to solve them once and for all and give our tiny entryway a whole lot of functionality too. What I ended up with is hooks and baskets. No more open shelves! I determined that clutter will always be but I can handle the clutter so long as I don’t have to see it J. Below is the end result – ain't she pretty?
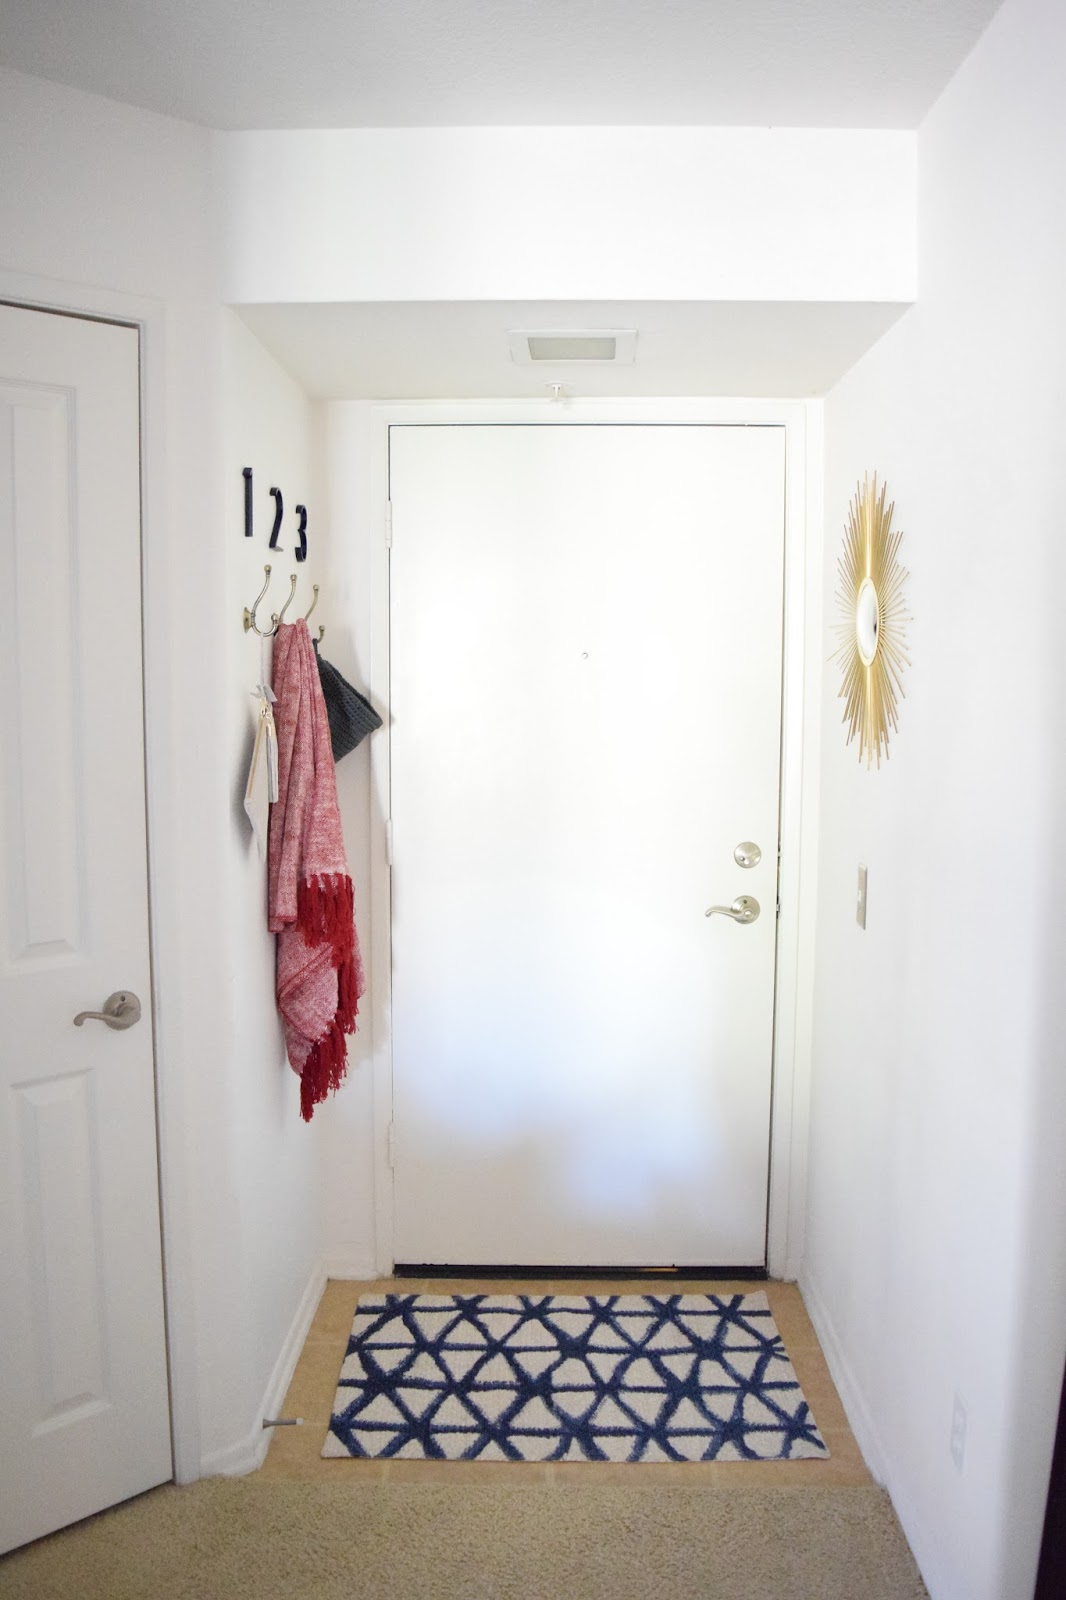

I installed a set of 3 hooks that people of all ages can use with ease – no more hassling with hanging our coats in the coat closet. For whatever reason, hooks are so much easier for kids and even grown men to use. The thought! We still keep additional coats in the nearby closet but for the ones we use more often, these hooks have been a saving grace. They’ll come in handy too for guests who need a quick and easy spot to store their coats while they’re visiting without having to ask where to put it. Using the hooks in our entryway have worked so well that I’m thinking of using them in the bathrooms too instead of towel bars – another things certain people in our household have trouble using!


To tackle all the other clutter that seems to accumulate at the front door, I hung up a woven basket that I picked up from the bath section at Ikea to corral wallets, receipts, cards, loose change – all of the above! As I said before…as long as I don’t see it, I can deal with it. The basket conceals the mess and is big enough to hold every day essentials like wallets and keys. I still keep my keys inside our coat closet with my purse, but for my guy who likes to empty his pockets at the door, this has been a perfect solution for him. When it starts getting out of hand, I can easily sort through the contents and purge what isn’t needed. What was once a daily battle is now something that only needs to be managed once a week. A win-win.


Once the issues had been addressed, it was time to add in some personality! My favorite part of any project. I added a couple of address numbers above the hooks because they were right next to the hook section at Lowes and I liked how modern and sleek they looked next to the almost aged look of the hooks. I painted the numbers a deep navy blue which ties in the brand new Target rug I found at Goodwill (score!). Goodwill is like Target’s clearance center in case you haven’t been lately.


The sunburst mirror added to the opposite wall lets us ladies (or guys too) do a last minute quick look when we’re headed out the door and it’s gold color coordinates with the aged hooks on the opposite wall.


Here's a look at the new entry in relation to the coat closet that I organized almost a year ago. The systems I installed nearly a year ago are still working well for our family so now with the functionality of both these spaces give us no room to make excuses!


Making these small changes has really added so much value to this tiny space and allowed it to really work for our family. Living in such tight quarters makes every bit of real estate so valuable and when it can function the way our entryway functions now it makes the time and money spent very well worth it.

Friday, March 6, 2015

30 Day Entryway Closet Check-In & a Quick Little Project

Hi friends!
 
I'm back today to give a 30 day check-in of our entryway closet organization project and to let you in on what's worked, what hasn't, and how I addressed it.
 
Remember a month ago when I shared this before and after?

 
With a few organizational additions installed and some visual de-cluttering, it's amazing how so little can go such a long way. However, as we continue along our organizational journey, sometimes things could use a little tweak, a little umph, to really take it to the next level.

This little closet organization project has done wonders for our family but after using this space for a month, I realized that one area of this space, needed a little extra organizational help.

I have a confession...

We suck at mail. We pay most all our bills online and who doesn't get truck loads of credit card offers and junk mail? So needless to say, we procrastinate when it comes to opening and sorting through the mail and as a result, we would just shove all the mail in the inbox until it couldn't hold no more.

See?

The inbox on the door was/is an awesome idea, and really, truly has worked wonders. It just needed a little help to help us be better at sorting the mail. My solution?


I took some generic binder clips that I had on hand, added some washi-tape to the front & back, and labeled them with a permanent marker. Now we can clip the mail with these washi-tape clips into self-explanatory categories.

 
They've really helped to corral the mail and prevent it from getting out of hand. So easy to make too!
 
And when we're not using one of the clips? They easily clip to the edge of the basket just waiting to be used...like so:
 
 
The only other addition is a chevron file folder that holds all our coupons and gift cards that staying in the "Outgoing" mail box that we can quickly grab anytime we're heading out the door.
 
 
With these 2 small additions/tweaks, our coat closet is working like a dream and we're no longer combating a messy inbox and overflowing mail.
 
 
I love quick and simple projects like these washi-tape binder clips. I wonder where else I could employee these cuties? Any suggestions? Where would you use some in your home?


Friday, February 27, 2015

Cut The Clutter - Coffee Table Clean-Out

In an effort to clean and organize all our spaces and rid our apartment of the clutter we accumulated in 2014, I started down the road of cutting the clutter last month and it's been full steam ahead ever since!
 
You may recall that I tackled our entryway closet earlier this year and since taking on that project and seeing how effective having a clutter-free space has been for us, I started in on another un-organized thorn in our side: the coffee table.
 
Our hand-me-down coffee table that I've had for over 5 years has 4 generous sized drawers and while I'm grateful for the storage space, we definitely didn't utilize it properly...until now! Space is such a premium in our apartment and I've learned that in order to maximize on every bit of valuable real estate, everything we choose to keep in our apartment must have a designated space because when it doesn't, this is what happens:


We don't have a huge kitchen that affords us the luxury of a "junk drawer" so instead, the coffee table drawers have become our catch all for all the junk. There was too much junk in the trunk and it was time for the junk to go!
 
Like I did with the closet, the first thing I did was empty everything out and sort like items into piles so I could see what I was working with and how many bins I'd need to corral all this madness.
 
 
Side note...is 7 rolls of tape really necessary? Looks like in an effort to find one roll of tape, I bought 6 extras. Guess that's what happens when your coffee table is bursting at the seams and finding anything, let alone tape, is next to impossible.
 
After I sorted everything out, threw away the trash, I realized that a lot of what had accumulated in the coffee table were items that were simply misplaced and belonged elsewhere. So after re-directing those items to their correct homes, I was able to see what I was working with and  headed to the dollar store to pick up some bins. The bottom drawers of our coffee table are pretty deep so finding bins for the bottom drawers wasn't all that hard however the top drawers are pretty shallow so I decided to forgo bins all together. All in all I needed 13 bins for both bottom drawers.

One of the things I learned through my last attempt at employing some storage bins in these drawers is that when the bins don't fill the entire space, it's easy for the drawers to end up in chaos. With too much free space between the bins, the easier it is to just throw things anywhere! When the bins fill all the available space, you're almost forced to put the item back where it belongs.

So without further adieu...
 
Here she looks all decked out in all her organized glory!! (guess I just decided my coffee table is a she now)
 
 
I decided on 8 bins for the right drawer and 5 for the left. After determining homes for all the contents of the coffee to the new bins, I decided to take it up another notch.
 
I used some card stock that I had on hand, traced the bottom of each bin onto the paper, cut out the card stock and placed the decorative paper in the bottom of the bin.
 
 
Taking the couple extra minutes to pretty up the bins really goes a long way. When it's not only organized, but it looks good too, I feel as if you're more inclined to keep it that way and for only a couple extra bucks, you really can't beat the cuteness of it all!
 
All in all, I'd say this coffee table, or junk table, was a total success and it feels so good to have another organized space checked off the list! How's this for a before and after:
 
With everything assigned a new home, we have no need to use the top drawers although I could see these top drawers turning into storage for envelops or shipping supplies, but for now, they're as empty as can be!
 
For less than $20, I'm so happy with the end result and this coffee table is no longer a thorn in my side!