Showing posts with label first home. Show all posts

Monday, June 6, 2016

Progress Report: The Entry

Hey guys! Remember me?! Life and work has been crazy-busy and it’s kept me away from the blog a little too long but I’m back at it and here today with a little update post!

It’s been a few weeks since we jumped into our entry project and we've been making great progress. Aside from painting and a few remaining items (art, rug, etc.) needed to round out the space, we’re just about ready for a reveal! How exciting is that?!
But before we get to all the progress, let’s rewind back to the beginning…mmmkay?

This is what the space looked like before we got started:


And here’s the to-do list that we were working with:

To-Do:
1.      Create storage for coats, jackets, bags – hooks? Slim wall mounted shoe storage?
2.      Add board & batten? Picture frame trim/molding?
3.      Paint interior of front door & add decorative trim
4.      Add art
5.      Install a flush mount light fixture
6.      Find a vintage runner
Let’s run down the check list and see where we stand after launching into this project a few weeks ago:

#1 – Create storage for coats, jackets, bags – hooks? Slim wall mounted shoe storage?
ü  Check! I decided to go with hooks because as you may have seen in my post about the entry plans, they just make life easier. The hooks haven’t been hung but they’re in possession of my grubby little hands!
#2 – Add board & batten? Picture frame trim/molding?

ü  Check! We ended up going with neither but decided to plank both walls on either side of the entry…with a twist! We still need to finish prepping and give the walls a couple coats of paint but we’re thiiiiis close to being finished. I have high hopes for this little entry of mine!
#3 – Paint interior of front door & add decorative trim


ü  Check! Door has been painted but trim still needs to be added and then given a secondary coat for a seamless look. Did we go black or a deep navy blue? Can you tell in these pictures? 
#4 – Add art
              Zip. Zilch. Nada.
#5 – Install a flush mount fixture


ü  Check! The first fixture we installed just wasn’t cutting it – the diffuser wasn’t cut correctly and had all sorts of funky gaps between the shade and diffuser and I don’t think it fit the space like I thought it would (rememberit’s ok to change your mind). After striking out the first time, my second at bat was a home run! But all you’re getting is a sneak peak in the photo above :)
#6 – Find a vintage runner

Again with zip.zilch.nada. Finding a runner in the exact size I need has proved to be difficult. I have a temporary one in place for now but the color and size aren't quite right. 

Well...that's it guys! We've been working really hard on the entry, but also taking time to be purposeful in our decisions and choices for this space. I'm happy to say that we're nearing the finish line and that working towards the first completed space in our home has been so much fun too!

Come back tomorrow and I'll be sharing my go-to sources for vintage rugs - probably the hardest item to find to finally, FINALLY, call this space done! Or...however "done" a space could possibly be around here. 


Tuesday, May 10, 2016

Entry: The Plan

We’re in that awkward stage of renovation where if feels like we’ve got a whole lot going on but not a whole lot is actually getting done. Can any of my reno buddies relate?! To date, we’re still knee waist deep in flooring that needs to be laid, and only 1 of 6 room is 100% completed, floor-wise (!@#$). #pleasesendhelp #andcookies

So! Even though the majority of our spaces are only partially completed, we’ve got enough of the foundation laid that we can start living like humans again and begin to work on stuff like what I came here to talk about today: plans for our entry way!


The entry of any home is one of the, if not the most, hardest working area in any home and I don’t think anyone would argue with me about that. The entry way in our apartment could hardly be called a proper “entry way” but I did the best I could with the space we had in conjunction with the adjacent coat closet to make it functional for us while we lived there. It came as no surprise to me that in our new-to-us home, this was the first space I wanted to tackle.

I don’t know about you, but when I walk through the front door after a long day of work (or rush out on a hectic morning), the last thing I want to be greeted by is chaos and clutter. Just the sight of shoes, bags, keys, or mail, cluttering up such a high traffic area can make or break my mood for the day. After living here for 2 months without an ounce of organization in place, enough was enough!

The entry in our new home isn’t without its fair share of challenges. Albeit longer - not sure if that counts as “bigger” - it’s narrower and doesn’t even have a closet!! #holyheckbatman – how did I not notice that when we viewed the place?! That’s #nobueno. I have my work cut out for me. #again.

As I do with any makeover, I start by pinning some inspiration images. Here are a few that I was drawn to:


With inspiration in hand, I pulled together a mood board for the space. Doing this really helps me see how everything will come together in the end and more often than not I love the result a whole lot more when I take this approach rather than putting the design together as I go. For being such a visual person, it’s important for me to see the ideas that are percolating in my brain laid out on paper. That way I can play with color, texture, or finish combinations before I make any purchases and it results in less “buyer’s remorse”.

After swapping items and ideas in and out over the course of a few days, here's the final version of the mood board I ended up with: 


Aside from being one of the hardest working areas in our home, the entry will set the tone for our entire house. Colors, textures, and finishes seen here will be repeated throughout the main living areas to create a cohesive look and feel throughout. Some of what I've shown you in the above mood board are items we already own but will be re-purposed to work for our needs.

In an area that needs to check a lot of boxes, each item chosen serves a very specific purpose and will work really hard to make our entry way a whole lot more functional and organized. Let's dive right in and break it down a little further:

Light fixture:
          We only have a single can light in this area and aside from the fact that it doesn’t provide much             actual light, it just isn’t rocking my world. It feels very “apartment-esque” to have this type of                 lighting in our entry and adding a semi-flush fixture is the easiest way to class the joint up a bit.             Yuh feel me?

Shiplap walls:
          This house lacks so much character and adding shiplap to the walls here in the entry will right                that wrong. It's easy, inexpensive, and will bring interest where there is none.

Hooks:
          Because grown men and tiny humans know not what a hanger does or is. Hooks make life easier           for everyone involved. #mainlyme

Dresser:
           We may not have a closet but I scored a campaign dresser a while back and the dresser will                    accomplish the exact same thing as any closet would. There will be enough room for a mail                    station, our re-useable shopping bags, umbrellas and such.

Ottoman:
            A lucky Goodwill find will give us a place to put on or take off our shoes. The concealed storage             is the perfect place to hold our shoe polishing kit too. 

Vintage runner:
            Because every space is more beautiful with a one of a kind vintage rug. And because the cat                   needs a comfy place to lay while waiting for our arrival home. #truth

Well, guys...that's the plan for the entry. Thoughts?! I'll be working on it over the next few weeks and will be sharing bits and pieces here on the blog and on Instagram but man...I can't wait to have a fully functioning (and pretty) space to call done! What's the one thing you need for your perfect entry? Join the convo and share below!

Tuesday, May 3, 2016

I'm a Fan!

With our house still in disarray (read: we’re a blow-up mattress away from glorified camping) and while we’re stuck in this waiting phase of the renovation – we’re turning our attention to what can get accomplished during the downtime. So while all the chaos happens below our feet, things are looking up! 

Today we’re talking ceiling fans!

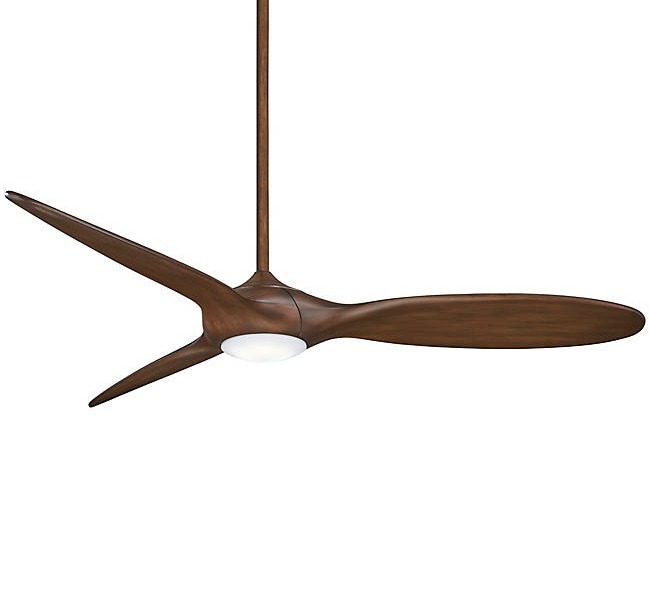
One of the more offensive fixtures in our home was this ugly and outdated ceiling fan:


Not to mention yellowed and discolored...


Sure, it was operational but it definitely wasn’t our aesthetic and during our initial walk-through of the house, it was at the very top of the list of things that had to go because…well…I hate ceiling fans. #truthbetold

But! In the 2 months that we’ve lived here, we’ve used it nearly every day. In a house that has no air conditioning (yes, you read that right) we quickly found that the ceiling fan was definitely a necessity. It cooled the main living areas down rather quickly and we were quick to flip it on during some rather stuffy early evenings. The verdict: it had to stay. 

As much as I wanted to come in here and buy new everything, when it comes to buying the finishing touches – light fixtures, rugs, window treatments – we’ve allowed ourselves to live in our house as-is (despite how ugly or outdated) before making any of these strictly-for-aesthetic purchases just to see how we use the space and how it functions for us. Hello howdy-doody roman shade in the kitchen or the ugly vertical blinds in the dining area. #baneofmyexistence.

Had we not allowed our house this little trial run, we would’ve swapped out the ceiling fan for a hip new chandelier (because hello! #ihateceilingfans) and come summer we would’ve been dripping in sweat and cursing the day we took the fan down.

I did a little digging on Pinterest for some ceiling fan inspo – it’s always my go-to source whenever I’m stumped (or indifferent) about a design decision – and ended up pinning these images below:


After my binge-sesh on Pinterest, I quickly realized that not only are there SO MANY ceiling fan options out there (why?) but your fan needs to be properly sized to your room for optimal efficiency. I found this guide about how to properly size your ceiling fan to be super helpful.

Armed with my Pinterest inspiration and now fully educated on ceiling fan sizing, the search was #onlikedonkeykong. Determining my new-found ‘ceiling fan esthetic’ (thank you Pinterest) and what size fan the room required for optimal efficiency (thanks to this guide), I was able to narrow down the field of possibilities quite a bit.

Here was the criteria I was working with:
  •          A fan that leaned a bit modern
  •         No boob lights / 4 cluster lights – single light kits only!
  •         3 or 4 blades
  •        Little to no down-rod (even though I love the look of a suspended fan, our ceiling height can’t       accommodate)

After an exhaustive search – both in store and online – we finally chose a winner and I placed the order today! I never thought I’d say this, but I’m ‘jumping up and down’ level excited about it and I cannot wait for it to arrive! #ohhappymail day it will be!

While I’m eagerly waiting for my fan to arrive there are no after photos to share just yet. But in the meantime, enjoy this round-up of the perfect modern fans for $500 or less…because someone of them are just too good not to share – and I did way too much online shopping for it to go to waste!
From one ceiling fan hater to another – enjoy!

With Light Kit:


Without Light Kit:


Have you ditched the hater train and joined the fan wagon? Because you totally should. Fans have come such a long way aesthetically and these ain’t yo Mama’s fan! #wordtoyourmother


Psst – my fan is lurking amongst the picks somewhere. Can you guess which one we chose?

Friday, April 8, 2016

Going Gray

If you know anything about gray then you know just how finicky it can be. The color gray (or grey) has so many variations – maybe a few too many IMHO. Choosing the right gray (or any color, really!) can leave you a little paralyzed, no?
 
I always hear people say “it’s just paint” and yeah…it is…but umm, hello!! #realitycheck. Who wants to paint something more than once? Not I. 

So whenever I choose paint (especially grays!) I always, ALWAYS buy a sample and try it out at home before committing. You should too.
 
Both Home Depot and Lowe’s have sample pots for under $5 and can mix any color from any manufacture in the paint brands they carry – Behr/Glidden @ Home Depot and Sherwin Williams/Valspar @ Lowes.
 
Knowing which color direction we were going in (gray) I headed to Home Depot armed with a long list of different grays from all different brands and asked the gentleman behind the counter to mix up some sample pots for me. I left the store that day with 8 samples and went home to try them out.
If you follow me on Instagram (smash that Follow button if you don’t) then you saw this a few weeks back:


We painted these 8 colors in 5 different places around the dining/living room and sun room just to see how the color would react or change depending on the different levels of light throughout the house. It’s important to do this in multiple areas throughout the space because the same color may take on several different tones depending on how much (or how little) light those areas receive throughout the day.


As I tried these samples on the wall, I knew almost immediately which ones weren’t going to work. I also knew almost immediately which one would. Gray is a funny color – some too blue, violet, brown, or even green – and seeing them all lined up next to each other made the undertones even more apparent. Can you spot the undertones in the photo above or below?


Even though I heavily leaned toward one favorite, I let S, my Mom, my Dad, even the 2 dump guys weigh in! S was firmly planted in the Stonington Gray camp and I was in love with Gray Owl…both from our buddy Benjamin Moore. While I loved Gray Owl (brown undertones) as is, Stonington Gray (blue/violet undertones) was a tad too dark for what I envisioned in this space. But I still wanted to take S’s opinion into consideration so I agreed to try a lightened version of Stonington Gray and see if that would change my mind.
 
So back to HD we went.

I asked the paint guys to mix me up a sample of Stonington Gray lightened 25% and another lightened 50%. And!! Because I’m a complete lunatic, I picked up a few other samples as well. Bringing the grand total to 12! #somebodyhelpme


We tried these additional 4 colors on the wall and spent the next few days staring at walls.


And guess what?!
 
I still loved Gray Owl more than any of the 11 others.
But...I lied.
Yep. I sure did. I told S I liked Stonington Gray lightened 50% and that we’d go with that one. Partly because I felt bad that I had asked his opinion just to veto it anyways and partly because I was trying to convince myself to love it even though I knew I wouldn't. I have a habit of doing that sometimes. #allthetime
 
But I forged on and did what any insane person would do.
 
I painted our entire hallway with the sample pot of Stonington Gray lightened 50%.
 
To S it looked like I had committed to the color he chose but I was just trying to convince myself I could actually live with it – haha!
 
Turns out I still hated disliked the color – it was even more purple (to me) in a larger dose – and it was then that I decided to trust my gut and go with Gray Owl. Without telling him. #ofcourse
 
I took S with me to HD to order the paint – mainly because I needed his muscles to carry the 5 gallon bucket of paint – but also because he’s pretty cute too. Luckily for me, he has a habit of sitting in the section with the outdoor furniture while I peruse the paint aisles so this worked perfectly for my genious color-swapping plan. Thank you Home Depot for putting the outdoor furniture near the paint section! #highfivesallaround
 
By time we got home with the paint he was none the wiser. Where’s that sly looking emoji with the smug smile when you need one?
 
The next day (while S was at work) I slapped a coat of paint on the walls and because we’re installing new baseboards and crown there was no cutting in needed!

 
When he came home from work that night the first thing he did was comment on how much he liked the color and said we had absolutely made the right color choice. Bahahaha!! #littledidheknow

I’ve since come clean. And he still loves the color. #andmetoo
 
Do you? The color, not me, silly.
  If you're thinking about dipping your toes in the gray paint waters (or any paint really!) here's a few tips to help you choose the right gray for you:

Find Pinspiration

Not sure where to start? Browse your Pinterest boards and see what colors/rooms you're drawn toward. Often times we Pin the same type, style, or look over and over. Are you pinning bold, moody rooms, or do you gravitate towards the light and bright spaces? Pinterest can tell you a lot about your own personal style and esthetic and is a great first stop on your painting journey.

Bonus: if you're not already following, be sure to keep up with me and all my latest Pins. I'm a pin-binger.
 
Buy the sample pots

Never ever buy a color based off what you see on the paint chip in the store. Even though it's an extra step (and an extra expense), the sample pots are absolute worth it to get it right the first time around. 

Bonus: those little sample pots come in handy for crafts or smaller projects around the house

Don't Limit Yourself 

Don't limit yourself to only the the colors offered by the manufacture(s) your hardware store carries. Any hardware store can and will mix any color from any manufacture in the paint line(s) they carry.
 
Bonus: Here's a great blog post about what stores carry what lines
 
Go Big or Go Home
 
Paint a swatch - a big one!! - on your wall and in several other areas throughout the space you're planning to paint. And then spend a few days staring at your choices.
 
Bonus: Don't forget to look at your paint colors at all hours of the day. Be sure to evaluate them in the morning, mid day, and night too! You'd be surprised how much the colors will change throughout the day.
 
Ask a Pro
 
Once you've chosen your color be sure to ask your paint pro their recommendations regarding sheen, application, and amount of paint needed depending on your project specs.
 
Bonus: Paint calculator #forthewin

 
So? Are you ready to dive right in and get your paint on? Tell me! How did you choose your color? Have you ever painted your walls only to find you hated them later? Do tell!


Wednesday, April 6, 2016

A Little Bit of This...

Welcome back to another week of renovation progress over at the casa! 

With most of the major demo (and dust) behind us on Day 1 and Day 2 of this remodel, we could finally turn our attention to things a little more appealing to this DIY-but not manual labor-loving girl. Like paint! And hardware! Pretty things! Gimme all the heart eyed emojis puhlease!


But first: dumping all that construction debris. #boring!
After the floor demo was completed we were left with all the demo debris and no real way to dispose of them. I'm kicking myself because I never took a picture of the giant pile of tile we tore out! Our original thought was to rent a dumpster through our local waste management company but without a decent sized area to park the size dumpster that was recommended, and the weight limitations on the size dumpster our small driveway would accommodate, we had to find another solution.

We contacted the contractor who quoted us $1700 to demo and dump to see if they would be willing to dispose of the material for us but they weren't interested (I don't blame them). After running into dead end after dead end, we started inquiring with companies that specialized in large item disposal. 

We had one company out and got an estimate upwards of $600 to haul away all our debris and at that point we were beginning to second guess our decision not to hire the whole thing out for $1700. But if I've learned anything so far in this entire renovation process, it's to never take the first quote and always shop around!

So we did.

The 2nd company that we called out quoted us $500 right off the bat. Seeing as they were already cheaper than the first company, we were willing to consider them. We asked if they would take $400 (it never hurts to ask), they said they couldn't but would do it for $465. S and I both gave each other a look, not wanting to wait any longer to get rid of this junk, so we said "DEAL"!

They got to work right away and as we watched them for a few minutes, we started to feel bad that they were out there sweating in the hot sun tossing our junk. Plus - throwing tiles down below into the bed of their truck looked super fun too! 

So we put on our work gloves and decided to lend them a hand. With the 4 of us it only took about 30 minutes to get all the debris loaded up in their big red truck.


After we had everything loaded they let us know that we had nearly 3 tons worth of material. Wow! I'm glad we decided to hire these guys instead of trying to haul this by ourselves! The best part? Because we lent a hand and saved them some time they decided to pass the savings onto us and we ended up paying $400 after all! #allinaharddayswork


When all that demo mess was finally GONE it was full steam ahead to painting. You may have seen here in this Instagram post that we tested out some different grays on the wall and you guys! The right gray is so hard to choose (more on that in a future post).


Once we I eventually decided on a color and I slapped on a coat of paint in the main living area over the course of a lazy afternoon. Still haven’t decided on paint for any of the bedrooms, bathrooms, or sun room. Indecisive party of one?

See that white bit of wall down at the bottom? The result of the best decision ever! Because we're installing new baseboard and crown means no cutting in! Makes painting almost enjoyable. #isaidalmost


After our little painting party I turned my attention to the interior doors. They were in rough shape and just your typical builder grade slab doors – totally unfancy. And in total need of some attention.

We didn't exactly have a whole lot of extra money (read none) in the budget to outfit the entire house with all new doors (that actually matched) so we DIY-ed our way to what will be some fabulous looking doors. #ifidosaysomyself


Here’s a little sneaky peak:
 

Then when all the fun was over we got schooled in all things "home owner". See that guy there? With that fancy saw thingamajig? Yeah...he's cutting out our soggy drywall that resulted from an upstairs leak. Cool. And mold? Real cool.


And that about brings you up to date on the home-reno front. Things have been slow moving this last week but we did manage to install a new toilet. And it was equal parts gross and hilarious! We're chipping away at that to-do list little by little each night but there's still a whole lot of not-so-fun things to tackle before the fun stuff can begin.

Living in a construction zone is starting to take it's toll. Living without any furniture, TV, any real kitchen stuff has forced us to get creative. Have you been here too? How did you survive? Suggestions welcome and WANTED!

More on that later. Till next time...